Meta has made a few updates recently, and one of the biggest is this. You no longer need business verification just to increase your WhatsApp messaging limits. If you message 2,000 unique contacts within 30 days and keep your quality rating high, you’re good.
That said, skipping verification isn’t always the best move.
Some features are still locked behind it. And more importantly, a verified business simply looks more trustworthy. It tells customers and Meta that your business is legit.
If you’ve ever opened your Business Manager and felt stuck on where to start, you’re not alone.
This guide breaks everything down step by step. It shows you exactly how to complete Facebook business verification without going in circles.
What Is Facebook Business Verification and Why Does It Matter?
Facebook business verification is Meta’s way of checking that your business is real. Not just a name and a logo, but an actual, legally registered company with a working phone number and address.
You do this inside what’s now called Meta Business Portfolio (most people still call it Facebook Business Manager, and that’s fine).
If Facebook has ever asked you to “verify your business,” this is what they mean. They want proof that your business exists, your details are accurate, and that you’re the real owner or representative. Once that’s confirmed, your account gets a higher level of trust on the platform.
Why does it matter?
On the surface, it might feel like just another box to tick. But it actually unlocks a lot behind the scenes. Here’s where it starts to matter.
1. Access to WhatsApp Business API features
If you’re using WhatsApp for marketing or customer conversations, verification becomes important fast. It helps you:
- unlock higher messaging limits
- use advanced tools like WhatsApp Flows
- become eligible for the official green/blue verification badge
Without verification, you’ll hit limits sooner than you expect.
2. More trust from Meta
A verified business is seen as more legitimate. In real terms, this means:
- fewer sudden restrictions
- lower chances of account reviews or shutdowns
- smoother approvals for campaigns and features
Think of it as building a good reputation with Meta early.
3. Access to advanced Facebook and Instagram features
Some features are simply not available until you’re verified. This includes things like higher ad spend limits, access to certain business tools, and smoother scaling when your account grows. If you plan to run ads seriously or scale your marketing, this step becomes hard to avoid.
However, one quick thing to note. If you’ve already verified your business before, maybe for Facebook Ads, you don’t need to do it again. Meta remembers.
But for everyone else, this is one of those steps that feels small but makes everything else easier once it’s done
What Are the Requirements for Verifying Facebook Business?

Before you even click the “Start verification” button, Facebook expects one thing. Your business details should be complete and accurate inside Business Manager. This is the part most people rush. And it’s usually where things go wrong.
The basics you need in place
Inside your Facebook Business Manager, you’ll need to fill out your Business Info properly. That includes:
- Legal business name
- Business address
- Phone number
- Email address
- Website
Everything here should match what’s registered with your local authorities. No shortcuts.
If Facebook can confirm your business using this information alone, you might not need to upload any documents. But if they can’t, you’ll be asked to upload proof, including:
- Business legal name: Certificate of incorporation, business license, VAT or tax registration
- Business address and phone number: Utility bill, bank statement, or official document showing your details
These documents need to be clear, recent, and match exactly what you entered earlier. After submitting your details or documents, Facebook may ask you to confirm access to your business.
This usually involves a code sent to your business email or phone. In some cases, it’s basic personal details for verification. But one thing you should ensure is: don’t try to “fix” missing info with fake details. Facebook is strict on this.
If anything looks off, your request can be rejected. In some cases, it can even affect your account. So, keep it clean. Keep it accurate. That’s what gets you approved faster.
How to Complete Facebook Business Verification
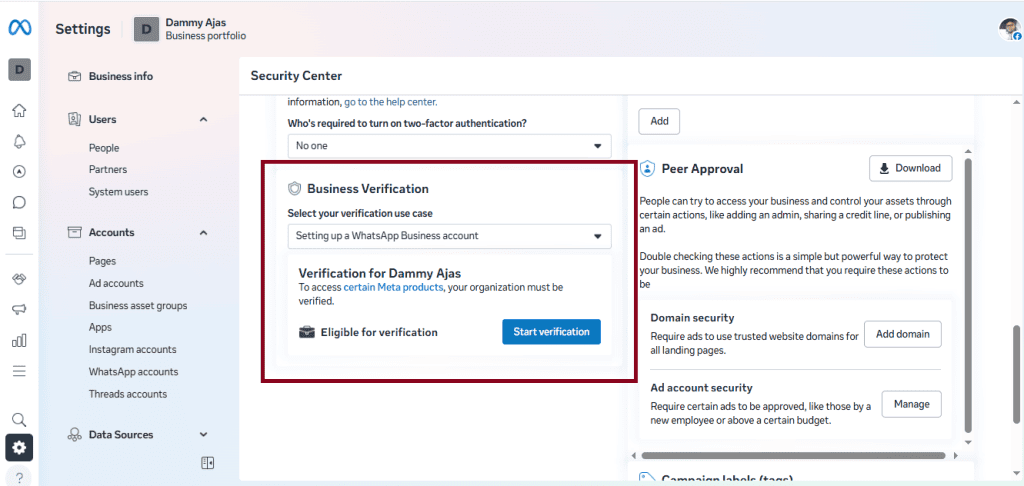
1. Start by logging into your Facebook Business Manager. From there, head to Business Settings, then open the Security Centre. This is where everything happens. You’ll see a “Start Verification” button. Click it.
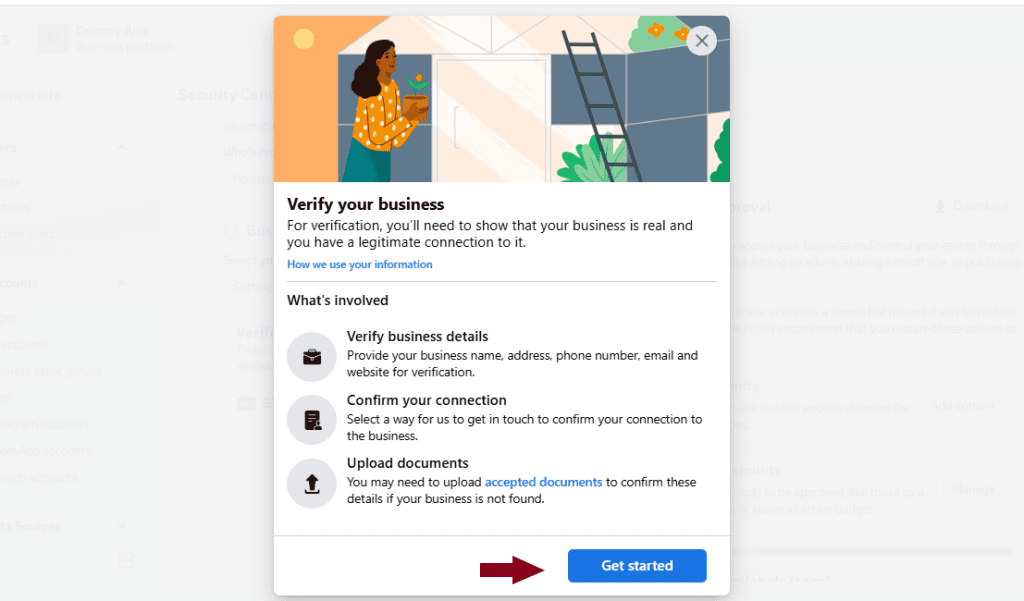
2. Now, click on “Get Started.”
3. Next, Facebook will ask where your business is legally registered. Choose the correct country and click on ‘Next’.

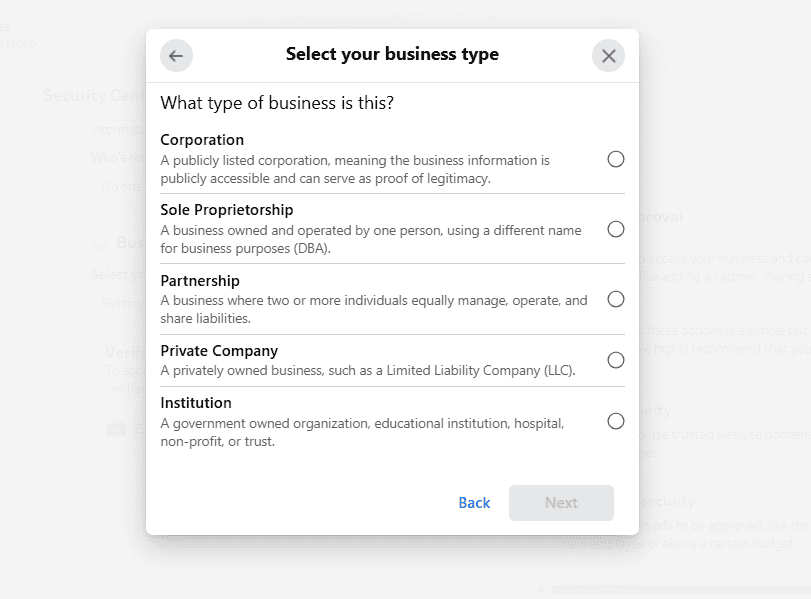
4. After that, you’ll need to select your business type. This could be a sole proprietorship if you run things alone, a partnership if there are multiple owners, or a private company like an LLC. Just pick what matches your actual setup.
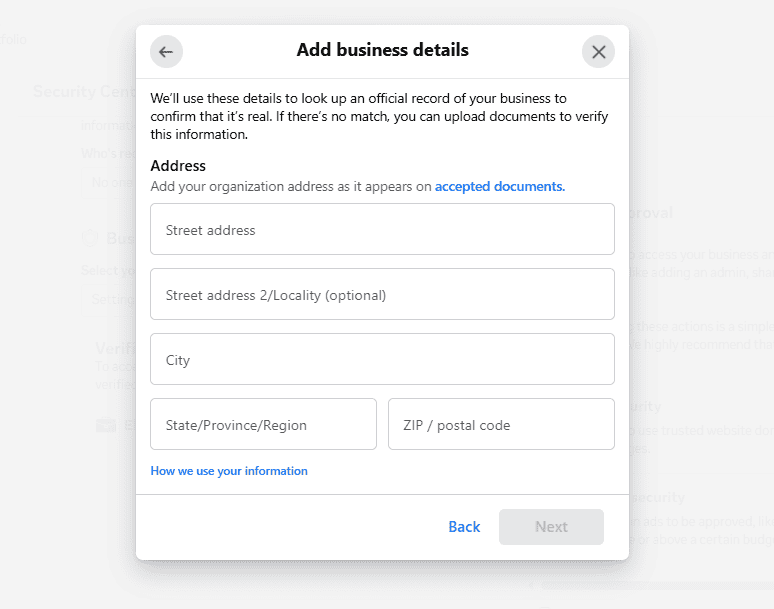
5. Enter your business details, including your legal business name, address, phone number, and website. Add them exactly as they appear in official records. Even small mismatches can slow things down later.
6. Once that’s done, Facebook will ask how you want to receive a confirmation code. You can choose email or text messages. Pick the one you have easy access to.
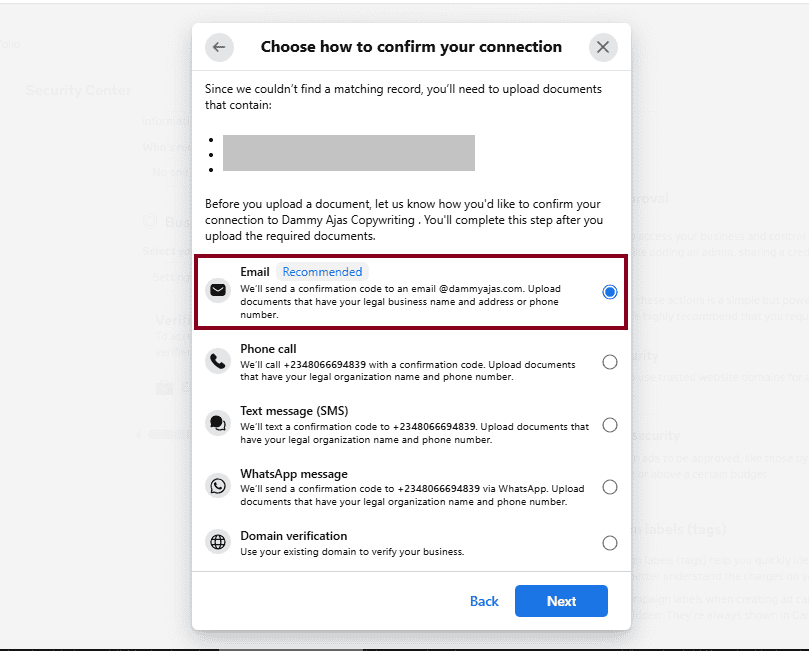
7. Upload your business registration document. This could be a certificate of incorporation or any official document that shows your legal business name. In most cases, Facebook will also ask for a second document to confirm your contact details. A recent utility bill or phone bill usually works fine.

8. When asked whether your business phone number is shown in this document, select “No”.
9. Enter the email or phone number where Facebook should send your verification code. Once you receive it, enter it into the form to verify your contact.
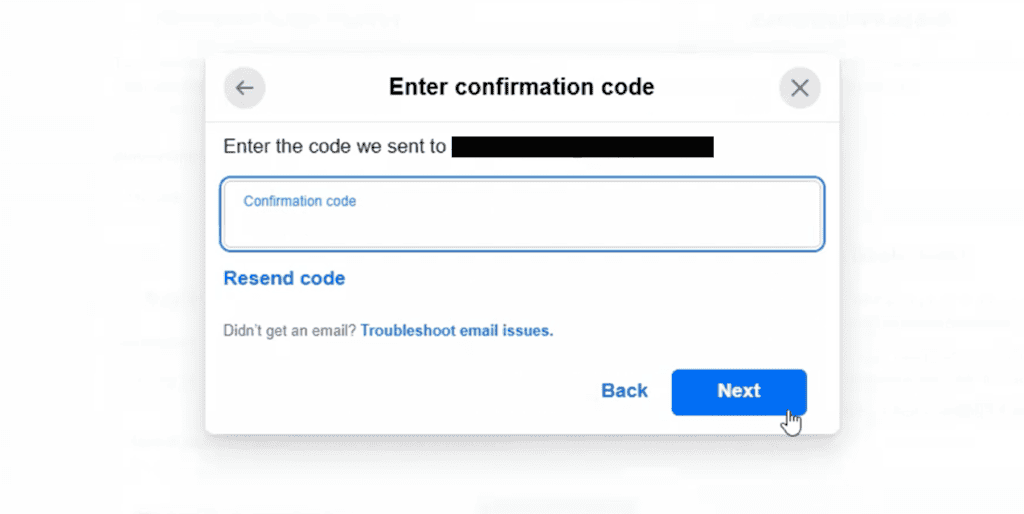
10. Click “Next”, then “Done” to submit your application.
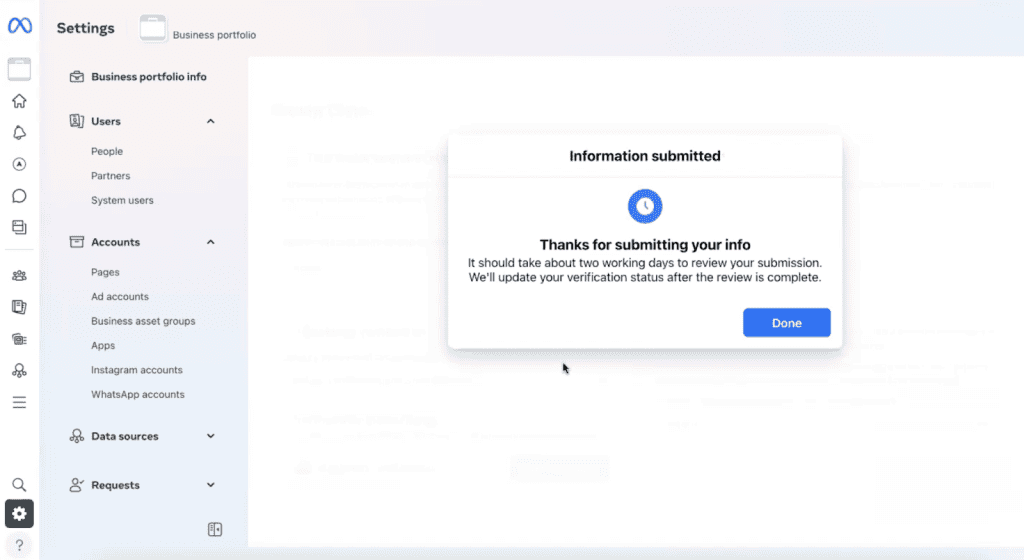
You can track your status in the Security Centre. It will usually show as “In Review” while Facebook checks everything. Most reviews are completed within a couple of business days, as long as your details are clean and match your documents.
How Long Does Facebook Business Verification Take?
In most cases, Facebook business verification doesn’t take long. Once you’ve submitted your details and documents, you’ll usually get an update within 1 to 3 business days.
You’ll receive a notification inside your Business Manager, and often an email as well. If you want to check manually, you can always head to the Security Centre or Business Info section to see your status.
If your verification isn’t approved the first time, don’t panic. Facebook may ask for additional documents or even a government ID to confirm your identity.
This usually happens when details don’t match or documents aren’t clear enough. Clean, accurate submissions tend to go through faster, so it’s worth double-checking everything before you send it in.
Final Note
Facebook business verification is one important step you need to take for your business. But you’re not alone if you’ve been putting it off. A lot of people do because it sounds more complicated than it really is.
But once you sit down and go through it step by step, it’s pretty manageable. Just make sure your details match your documents and take your time with the upload. That alone saves you from most delays.
Get it done once, and you won’t have to worry about it again while you focus on actually running your business.
FAQs
Do I still need Meta verification to increase WhatsApp API messaging limits?
Not always. Meta has changed how messaging limits work. You can now increase your limit by messaging up to 2,000 unique users within 30 days while keeping a good quality rating.
How do I check my current business verification status?
Log in to your Facebook Business Manager and go to the Security Centre. That’s where your verification status is shown. You’ll usually see something like “Not verified,” “In review,” or “Verified.” You can also check the Business Info section for updates.
Why is my Facebook Business Verification keep failing?
Most of the time, it comes down to mismatched details or unclear documents. If your business name, address, or phone number doesn’t match what’s on your official documents, Facebook will flag it. Blurry uploads or outdated documents can also cause issues. It’s worth going back, checking everything carefully, and submitting clean, accurate information.
What documents do I need to prepare before starting verification?
You’ll typically need a business registration document that shows your legal business name. This could be a certificate of incorporation, business license, or tax registration. In some cases, you’ll also need a second document to confirm your address or phone number, like a utility bill or bank statement. Having these ready upfront makes the process smoother.
Why can’t my business be verified by Meta?
There are a few common reasons. Your business might not be officially registered, your details might not match across documents, or Facebook simply can’t find enough information to confirm your business. Sometimes it’s also due to incomplete submissions or missing steps.