
How to Set Up DMly in 30 Minutes: Channels, Bookings, Payments and Your First Automation
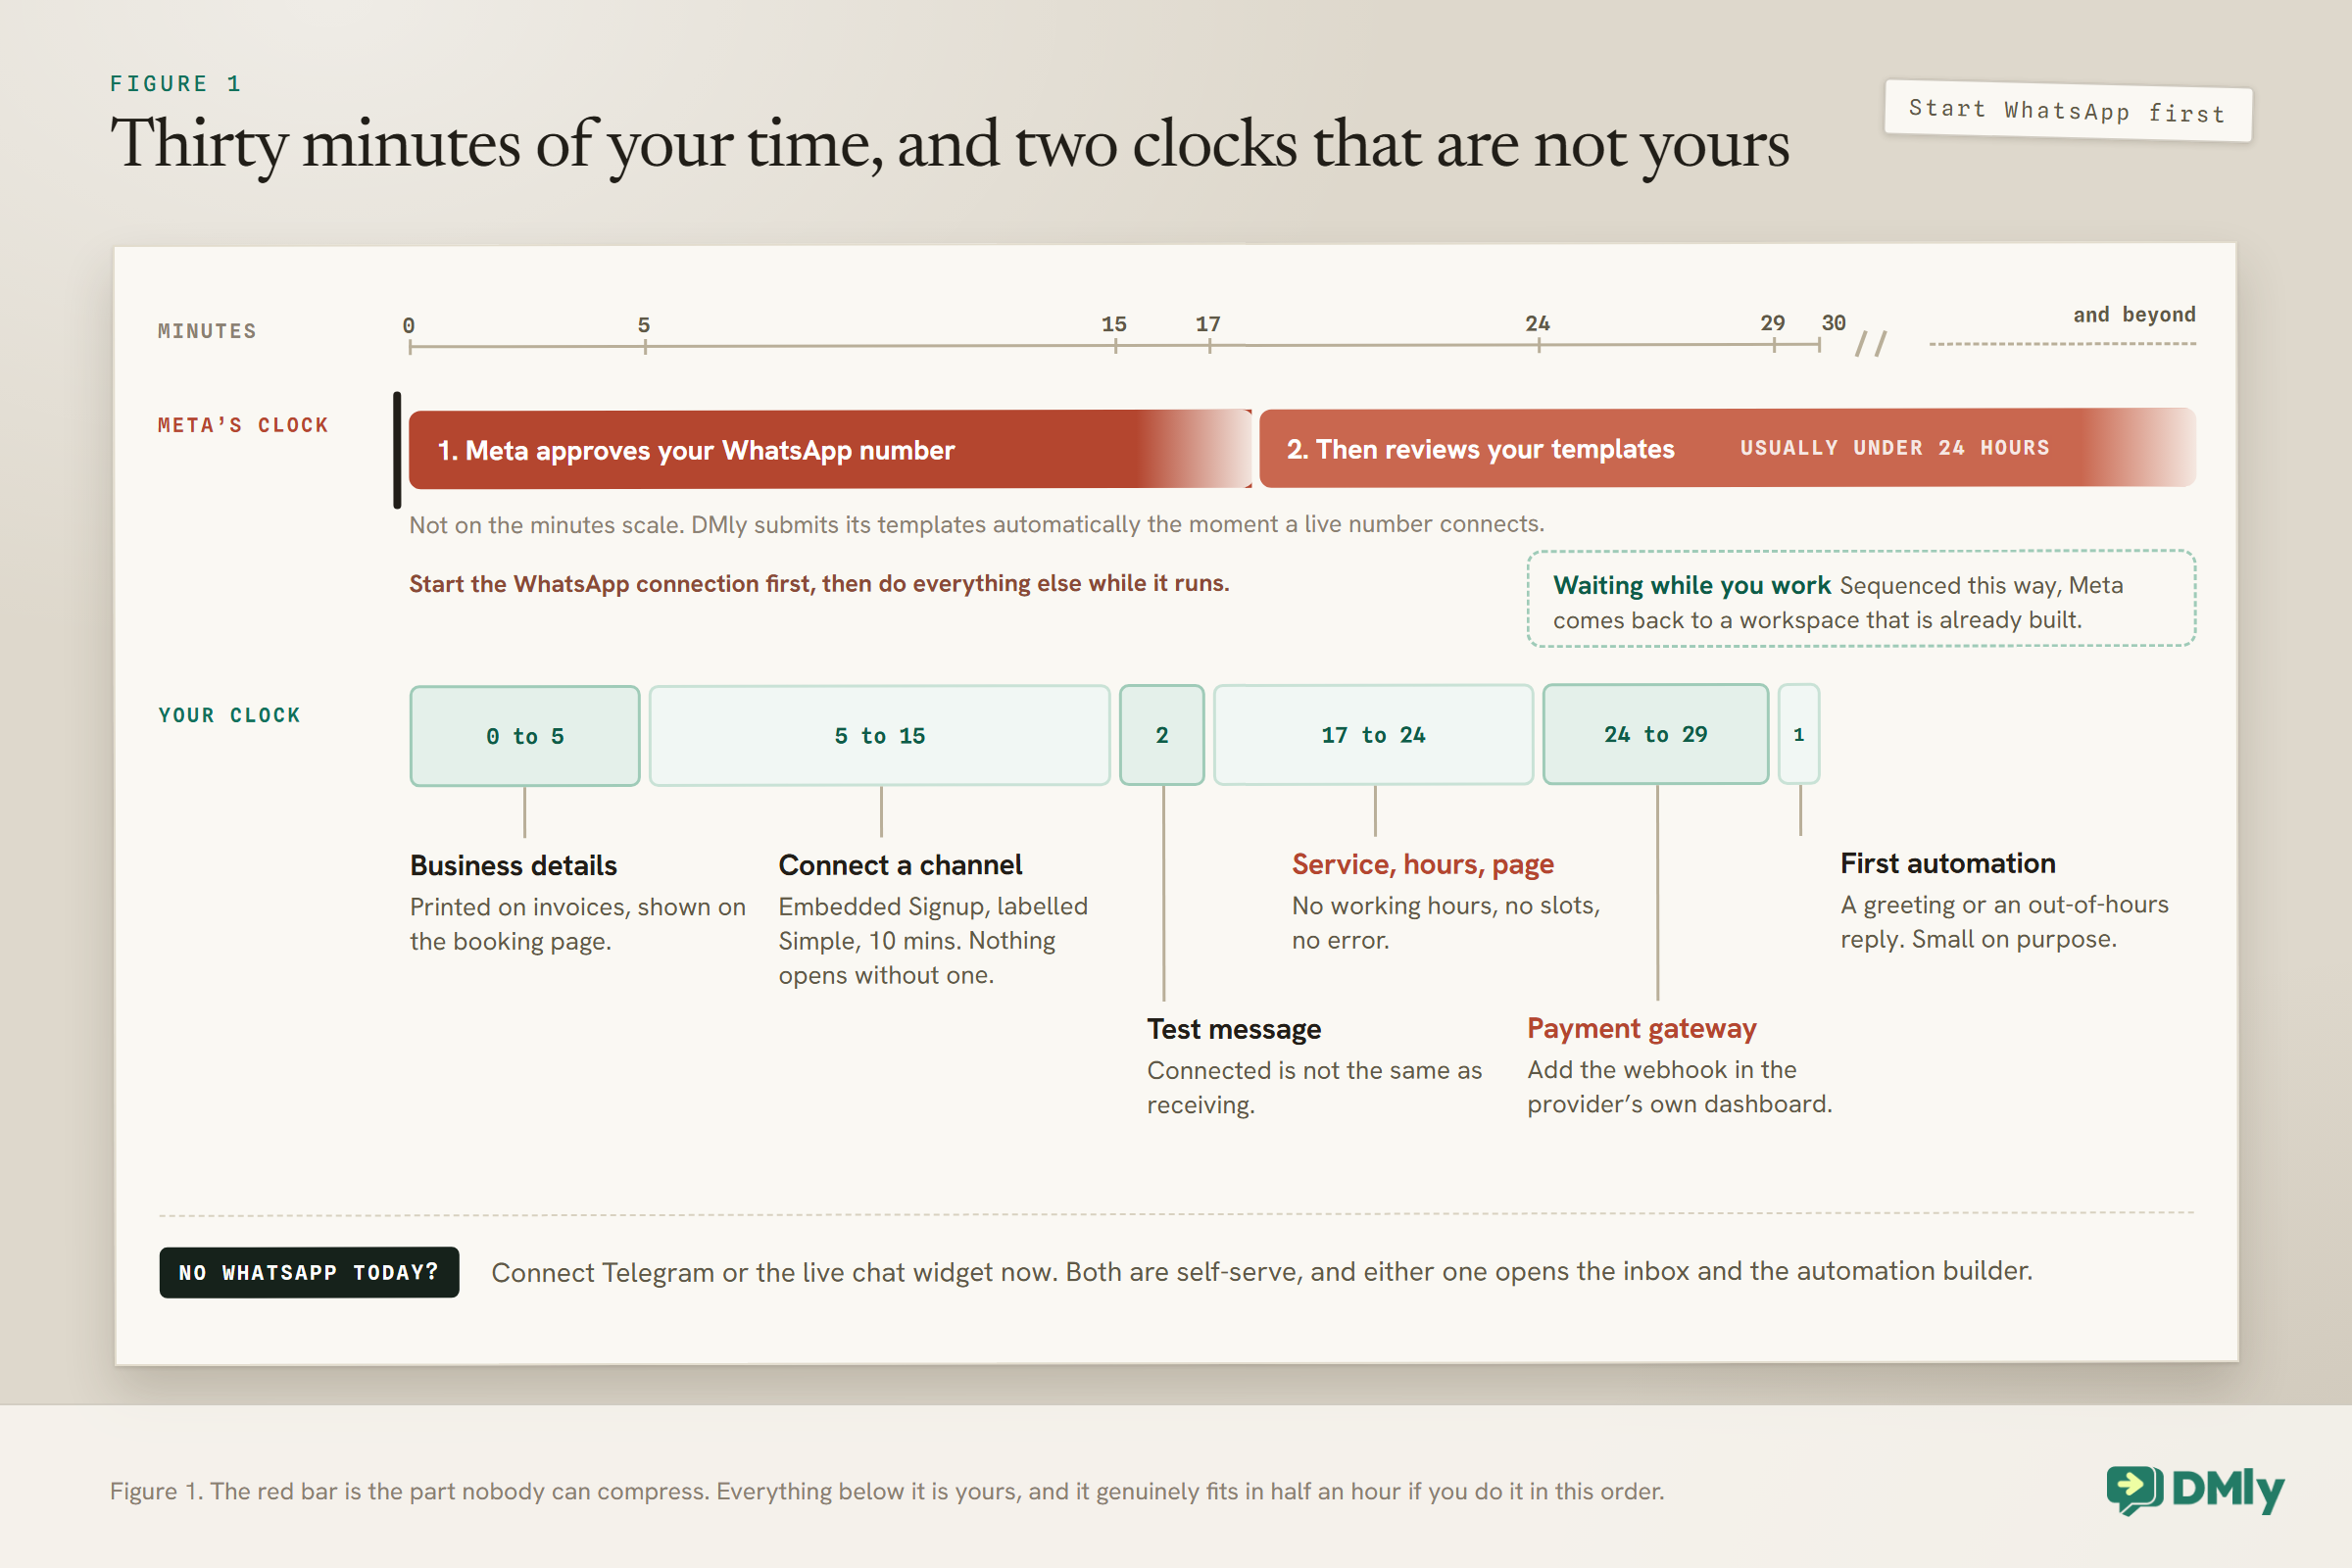
Our own documentation disagrees with the headline on this page. It says to set aside about an hour, and it names two things that depend on other people rather than on you. So before anything else, here is the honest version of what it takes to set up DMly: thirty focused minutes gets your business details, your bookings, your payments and your first automation genuinely working. Getting WhatsApp live is a separate clock, it belongs to Meta, and the single most useful thing you can do is start it first and then go and do everything else while it runs.
That is not a caveat buried at the bottom. It is the plan. Sequenced properly, the waiting happens in parallel with the work, and by the time Meta comes back your workspace is ready to use the moment it does.
What follows is the order that actually works when you set up DMly, minute by minute, with the four places people lose an afternoon marked as we go.
Minutes Minus Two to Zero: Creating the Account
Before the clock starts, one form and one email, and two of the fields matter more than they look.
Signing up is a single form, and DMly creates your workspace and lands you in the dashboard already signed in; there is no separate login step the first time. Two fields on that form are worth pausing over.
Business name is required, and it becomes your workspace name exactly as you type it. There is no separate business record underneath, and it is what your customers see, so type it the way you want it to appear, capitalisation and all. Typing it in lower case because you are in a hurry means fixing it in two places later.
“What do you do?” is optional and is not decoration. It sets which track the Get started checklist follows once you are inside: appointments, classes, shop, customer support or something else. Answer it honestly and the checklist you meet in a minute is the right one for you. You can change it later from the checklist itself with Change business type.
Then verify your email. DMly sends a verification link on registration, and until you select it every dashboard page bounces you to a Verify Email Address notice with a resend button. Do it before you start setting anything up rather than halfway through, because being bounced out of a half-finished screen is how people lose their first ten minutes. The one exception is if an agency signed you up on their own branded platform, in which case your account is already verified and there is nothing to do.
One thing to watch if you are the second person from your business to sign up: if a colleague invited you by email and you register with that same address, you join their workspace instead of creating one, the business name field does not appear, and you are taken to the invitation to accept. That is the correct behaviour and it means you should not be following this guide at all, because somebody else already has.
Before You Set Up DMly: The Two Clocks That Are Not Yours
Start both of these in the first five minutes and never think about them again. Leave them until last and you will finish your setup and then sit and wait.
Clock one: Meta approving your WhatsApp number. Connecting a number to the WhatsApp Business Platform goes through Meta, not through us, and how long it takes depends on your business and on Meta. There is no version of this that a messaging platform can speed up.
Clock two: Meta reviewing your message templates. The moment a live WhatsApp number connects, DMly automatically submits its built-in templates to Meta for review. You do not click anything to start this. What matters is what is true until they come back:
- Broadcasts have nothing to send. The template picker lists approved templates only, so anything still in draft, pending or rejected simply is not in the dropdown.
- Notifications outside a 24-hour window are skipped entirely rather than sent. Inside the window, they fall back to a plain message. So a booking confirmation to somebody who just messaged you works, and a reminder the following day silently does not.
Our documentation says that review usually comes back in under 24 hours, which is a description of the typical case rather than a promise. Plan your first broadcast around it rather than the other way round, and check where things stand under Templates in the sidebar, where Refresh templates re-syncs each status from Meta and resubmits any that never went.
There is a third thing worth knowing about while you wait, because it surprises people on their first campaign. A business that is not yet verified with Meta starts on a messaging limit of 250 customers in any 24 hours. If that is going to matter to you, our guide to completing Facebook business verification is the thing to start today rather than the week you want to send.
Minutes 0 to 5: The First Thing to Do When You Set Up DMly
This is first for a boring reason that saves an hour later: these fields are not decoration, and everything you create afterwards is stamped with them.
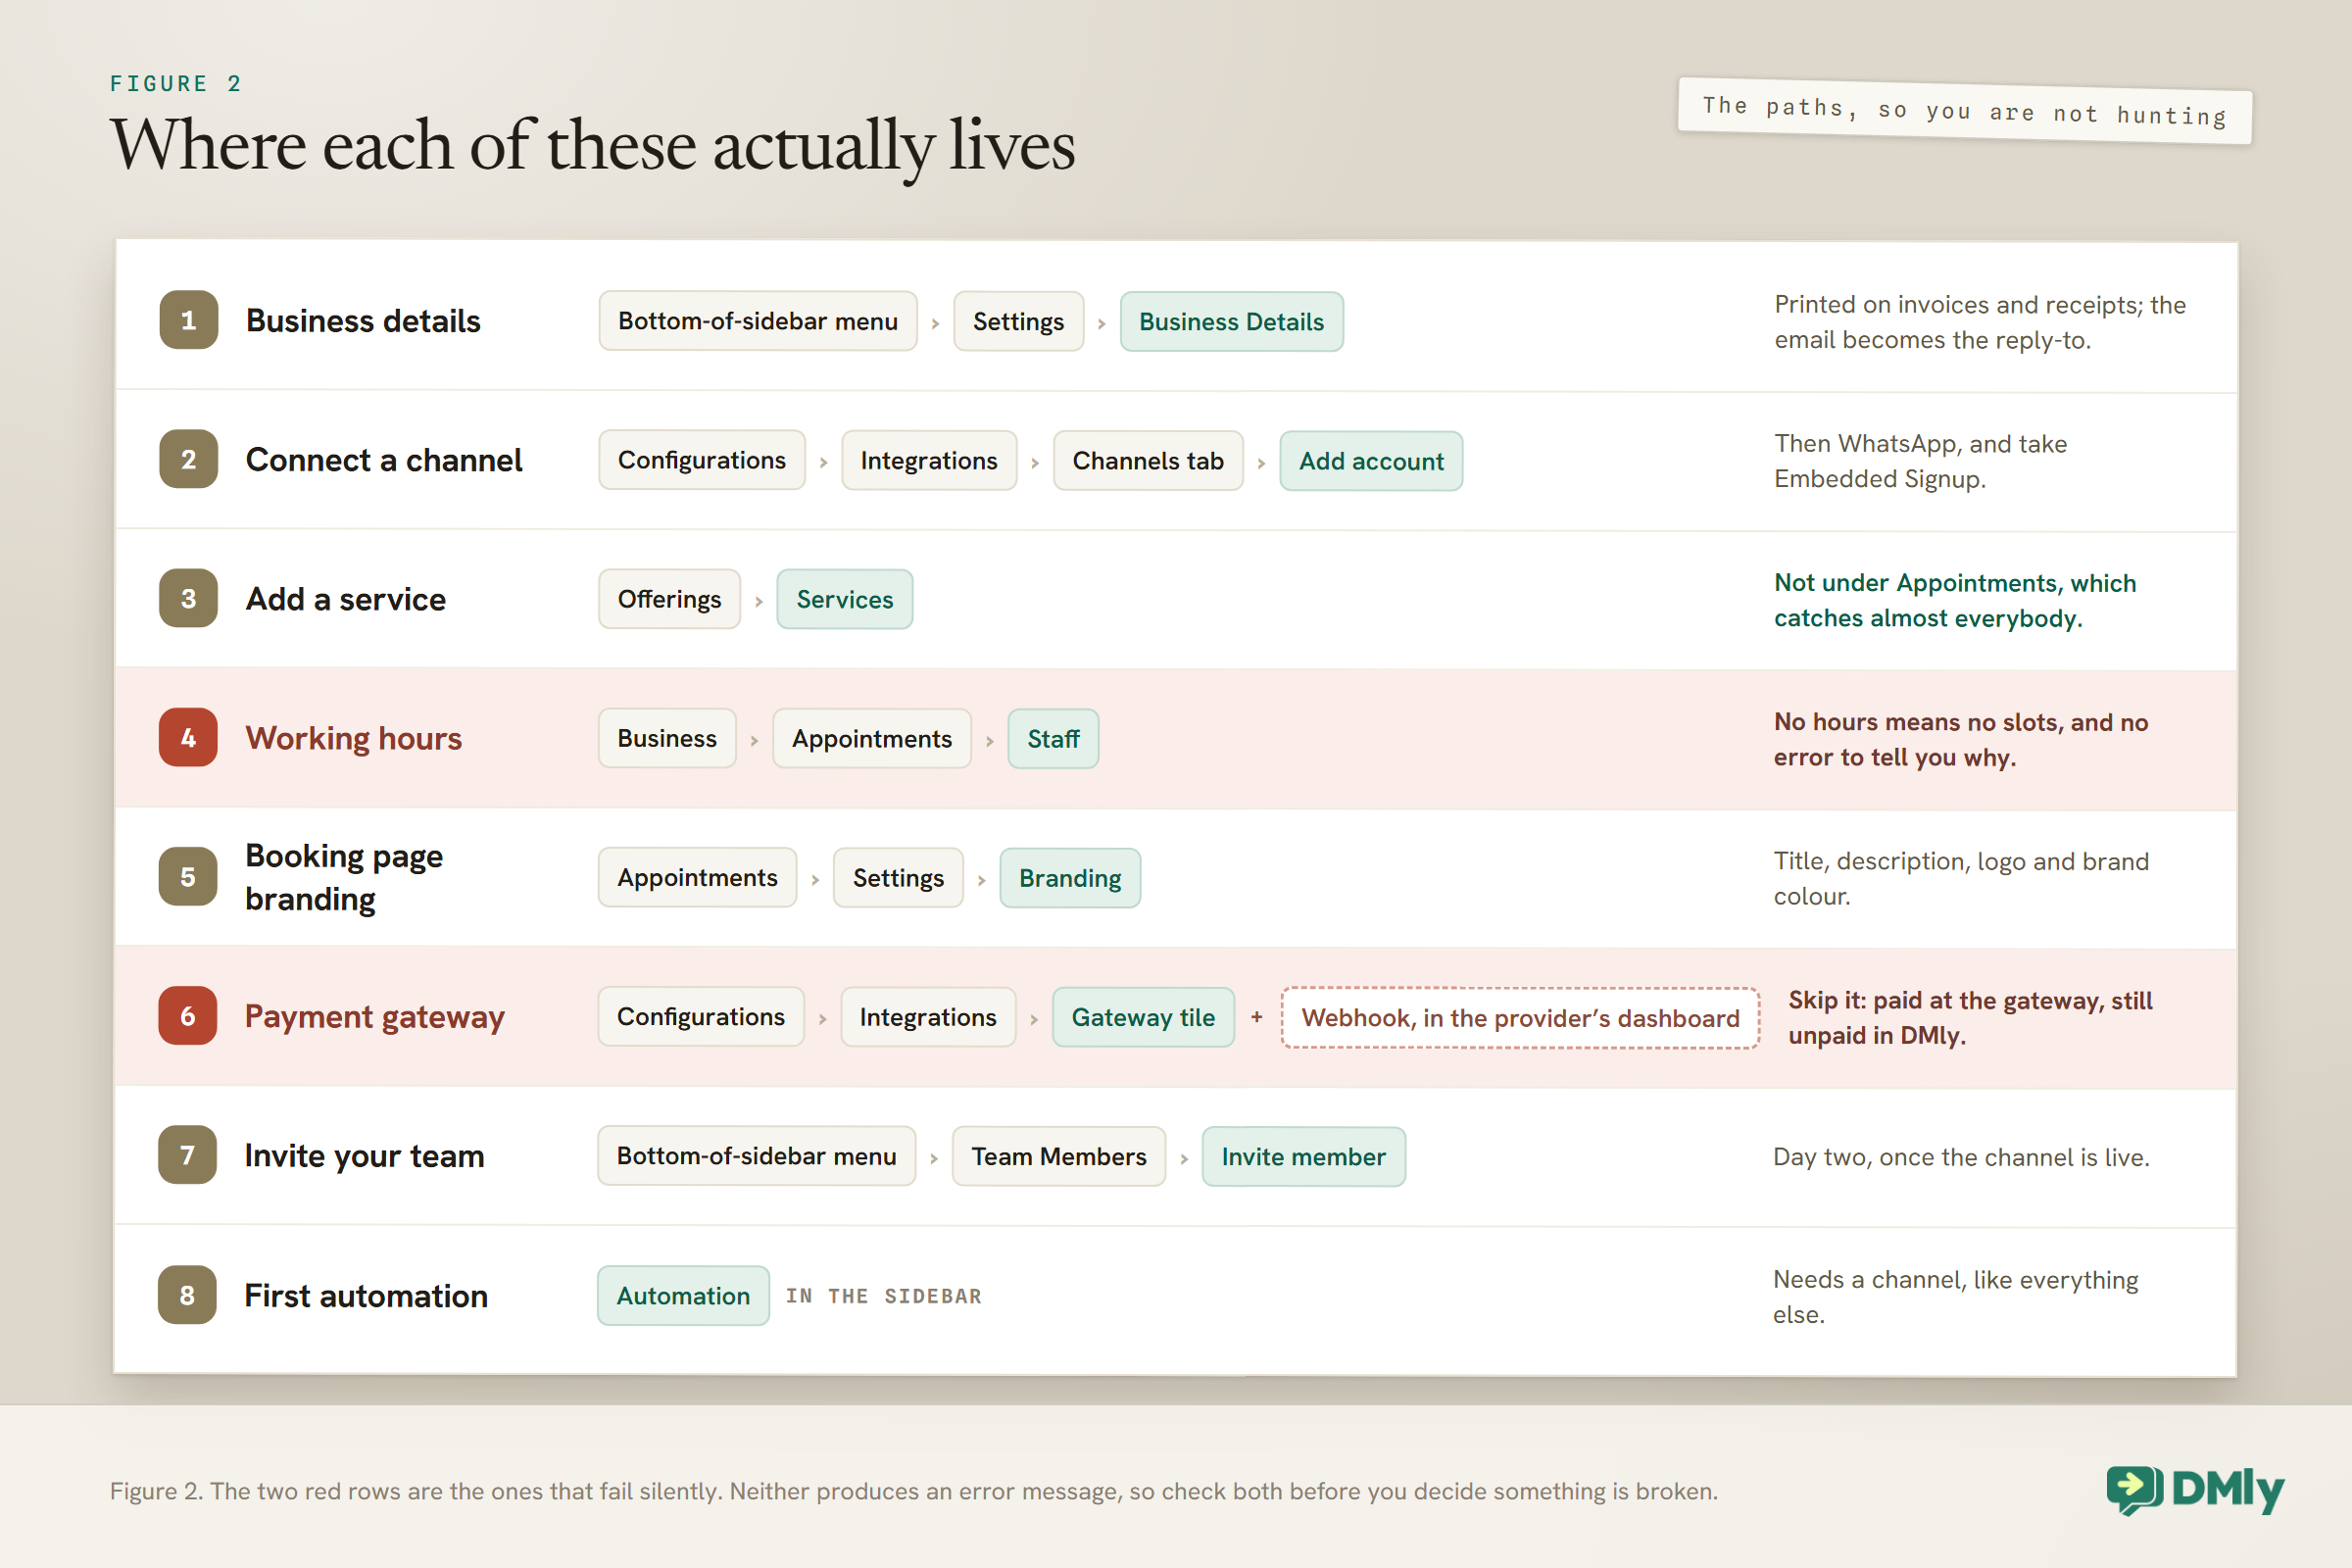
Open the menu at the bottom of the left sidebar, the one with your name and avatar, select Settings, and stay on the first tab, Business Details. Fill in your business name, business email, business phone, currency, address, and upload a logo.
Three of those do more than they look like they do. The details print on your invoices and receipts. They appear on your public booking page. And your business email becomes the reply-to address on outgoing email, so getting it wrong means customers replying into a mailbox nobody reads.
One thing worth knowing before you type: your workspace name is your business name. There is one field, and changing it changes both. If you were planning to call the workspace something internal and the business something else, you cannot.
Do this before you create a single service or invoice and everything downstream is already branded. Do it afterwards and you will be reissuing things.
Minutes 5 to 15: Connect a Channel, and the Wall You Hit Without One
Nothing else in the product opens until a channel is connected, so this is not one step among several: it is the gate.
In the left sidebar go to Configurations and then Integrations. The Channels tab is open by default. Select Add account, then WhatsApp. You get two routes, and the product labels them with its own time estimates:
- Configure WhatsApp via Embedded Signup, marked Simple, 10 mins. Then Connect a WhatsApp number. This is the one to use.
- Bring your own WhatsApp Cloud API keys, marked Complex, 30 mins. Then Configure. Only worth it if you already run your own Meta app, and if that sentence means nothing to you, it is not for you.
Take the first one. The second exists for developers who have already built something on Meta’s side, and choosing it because it sounds more capable is a way to spend half an hour discovering you did not need to.
Now the wall. Without a connected channel, Contacts, Broadcasts, Automation, Meetings and Growth Tools all show “Connect a channel first” instead of the real screen. This is the single most common reason a new workspace feels broken: it is not broken, it is waiting.
If WhatsApp is not going to be ready today, connect something else now: Telegram is fully self-serve: paste a bot token and you are connected, with nobody’s approval required. A live chat widget is also self-serve, though somebody has to paste a snippet into your website before it appears. Either one unlocks the inbox, the automation builder and everything else on this page today, so you can build your whole setup and simply add WhatsApp to it when Meta comes back. This is much better than staring at a locked screen for two days, and it costs you nothing to undo.
Minutes 15 to 17: Send Yourself a Test Message
Two minutes, and it is the step that separates a setup that works from one that looks like it works.
From your own phone, message the number, page or bot you just connected. Then open the Unified Inbox in the sidebar and check that it arrived.
The reason this matters is that connecting a channel and receiving on it are two different things. The connection can look perfectly healthy on the integrations screen while inbound messages never arrive at all, and you would much rather find that out now than when a customer does and hears nothing back.
If nothing appears: check the channel is listed under Configurations, Integrations, Channels, and that its card has no red dot. That dot means the channel is unauthorised and needs connecting again. If the card looks fine and messages still do not arrive, the problem is inbound delivery on Meta’s or Telegram’s side rather than anything you can fix from that screen, and it is worth contacting support with the channel name and the time you sent your test rather than reconnecting repeatedly.
Minutes 17 to 24: A Service, Your Hours, and a Booking Page That Looks Like You
Skip this whole section if you do not take bookings. If you do, there is one setting here that silently prevents everything from working.
First, the service. Go to Offerings in the sidebar and open Services. Add one. Its duration, buffers, price and payment mode all live here, along with Show on public booking page. This trips up almost everybody at some point: services are set up under Offerings, not under Appointments. The Appointments hub manages bookings, staff, availability and the booking page; the service itself is edited under Offerings.
Second, your hours, and this is the one. Go to Business, then Appointments, then Staff. Add yourself, or your staff, and fill in their working hours. Nobody is offered a slot until this is set. A brand new booking page with a service on it and no working hours behind it shows a customer nothing at all, and there is no error anywhere to tell you why. If your booking page looks empty, this is the first thing to check.
Third, the branding. Appointments, then Settings, then Branding. Add a booking page title, a description, a logo and a brand colour, so the page you are about to put in your Instagram bio looks like your business rather than a blank form. Our guide to the online booking page covers what else is on it.
Minutes 24 to 29: Payments, and the Step Almost Everybody Skips
Skip this if you are not taking money online yet. If you are, read the second half of it twice, because it is the most expensive mistake available in this whole setup.
Go to Configurations, then Integrations, and open the tile for your gateway. The choices are Stripe, PayPal, Paystack, Flutterwave, Monnify, Razorpay, MyFatoorah or Mercado Pago, which between them cover most markets. Paste in your credentials.
Then do the part that is easy to leave for later. Add the webhook endpoint the tile shows you, in the provider’s own dashboard. Not in DMly. In Stripe, or Paystack, or wherever your money actually lives.
Here is what happens if you do not. A client can pay successfully at the gateway while DMly still shows the invoice or the booking as unpaid. The money arrives. The record does not update. So the booking sits unconfirmed, the automation that fires on payment never fires, and somebody chases a customer who has already paid. It is a two-minute job that prevents a genuinely awful conversation, and our guide to setting up WhatsApp payments covers the flow it enables once it is right.
Minutes 29 to 30: Your First Automation
One flow, deliberately small, because the point of the first one is to learn the builder rather than to solve a problem.
Go to Automation in the sidebar and build a flow. Make it a greeting, or an out-of-hours reply. That is genuinely all it needs to be. It is the first thing that makes the product work while you are not watching, and it is the cheapest possible way to learn how the canvas behaves before you build something you actually depend on.
Two things about automation that are worth knowing on day one. It runs on every channel type, unlike broadcasts, templates and growth tools, which are each limited to particular channels, so whatever you connected in step two can run it. And like everything else, it needs a channel: with none connected it shows the same “Connect a channel first” message as the rest.
When you are ready to build something bigger, our no-code automation guide walks a real flow end to end, and the WhatsApp automation guide covers what is worth automating in the first place.
The Get Started Checklist, and the One Button Not to Press
There is a live checklist on your dashboard that tracks most of this for you, and three things about it are worth knowing before you rely on it.
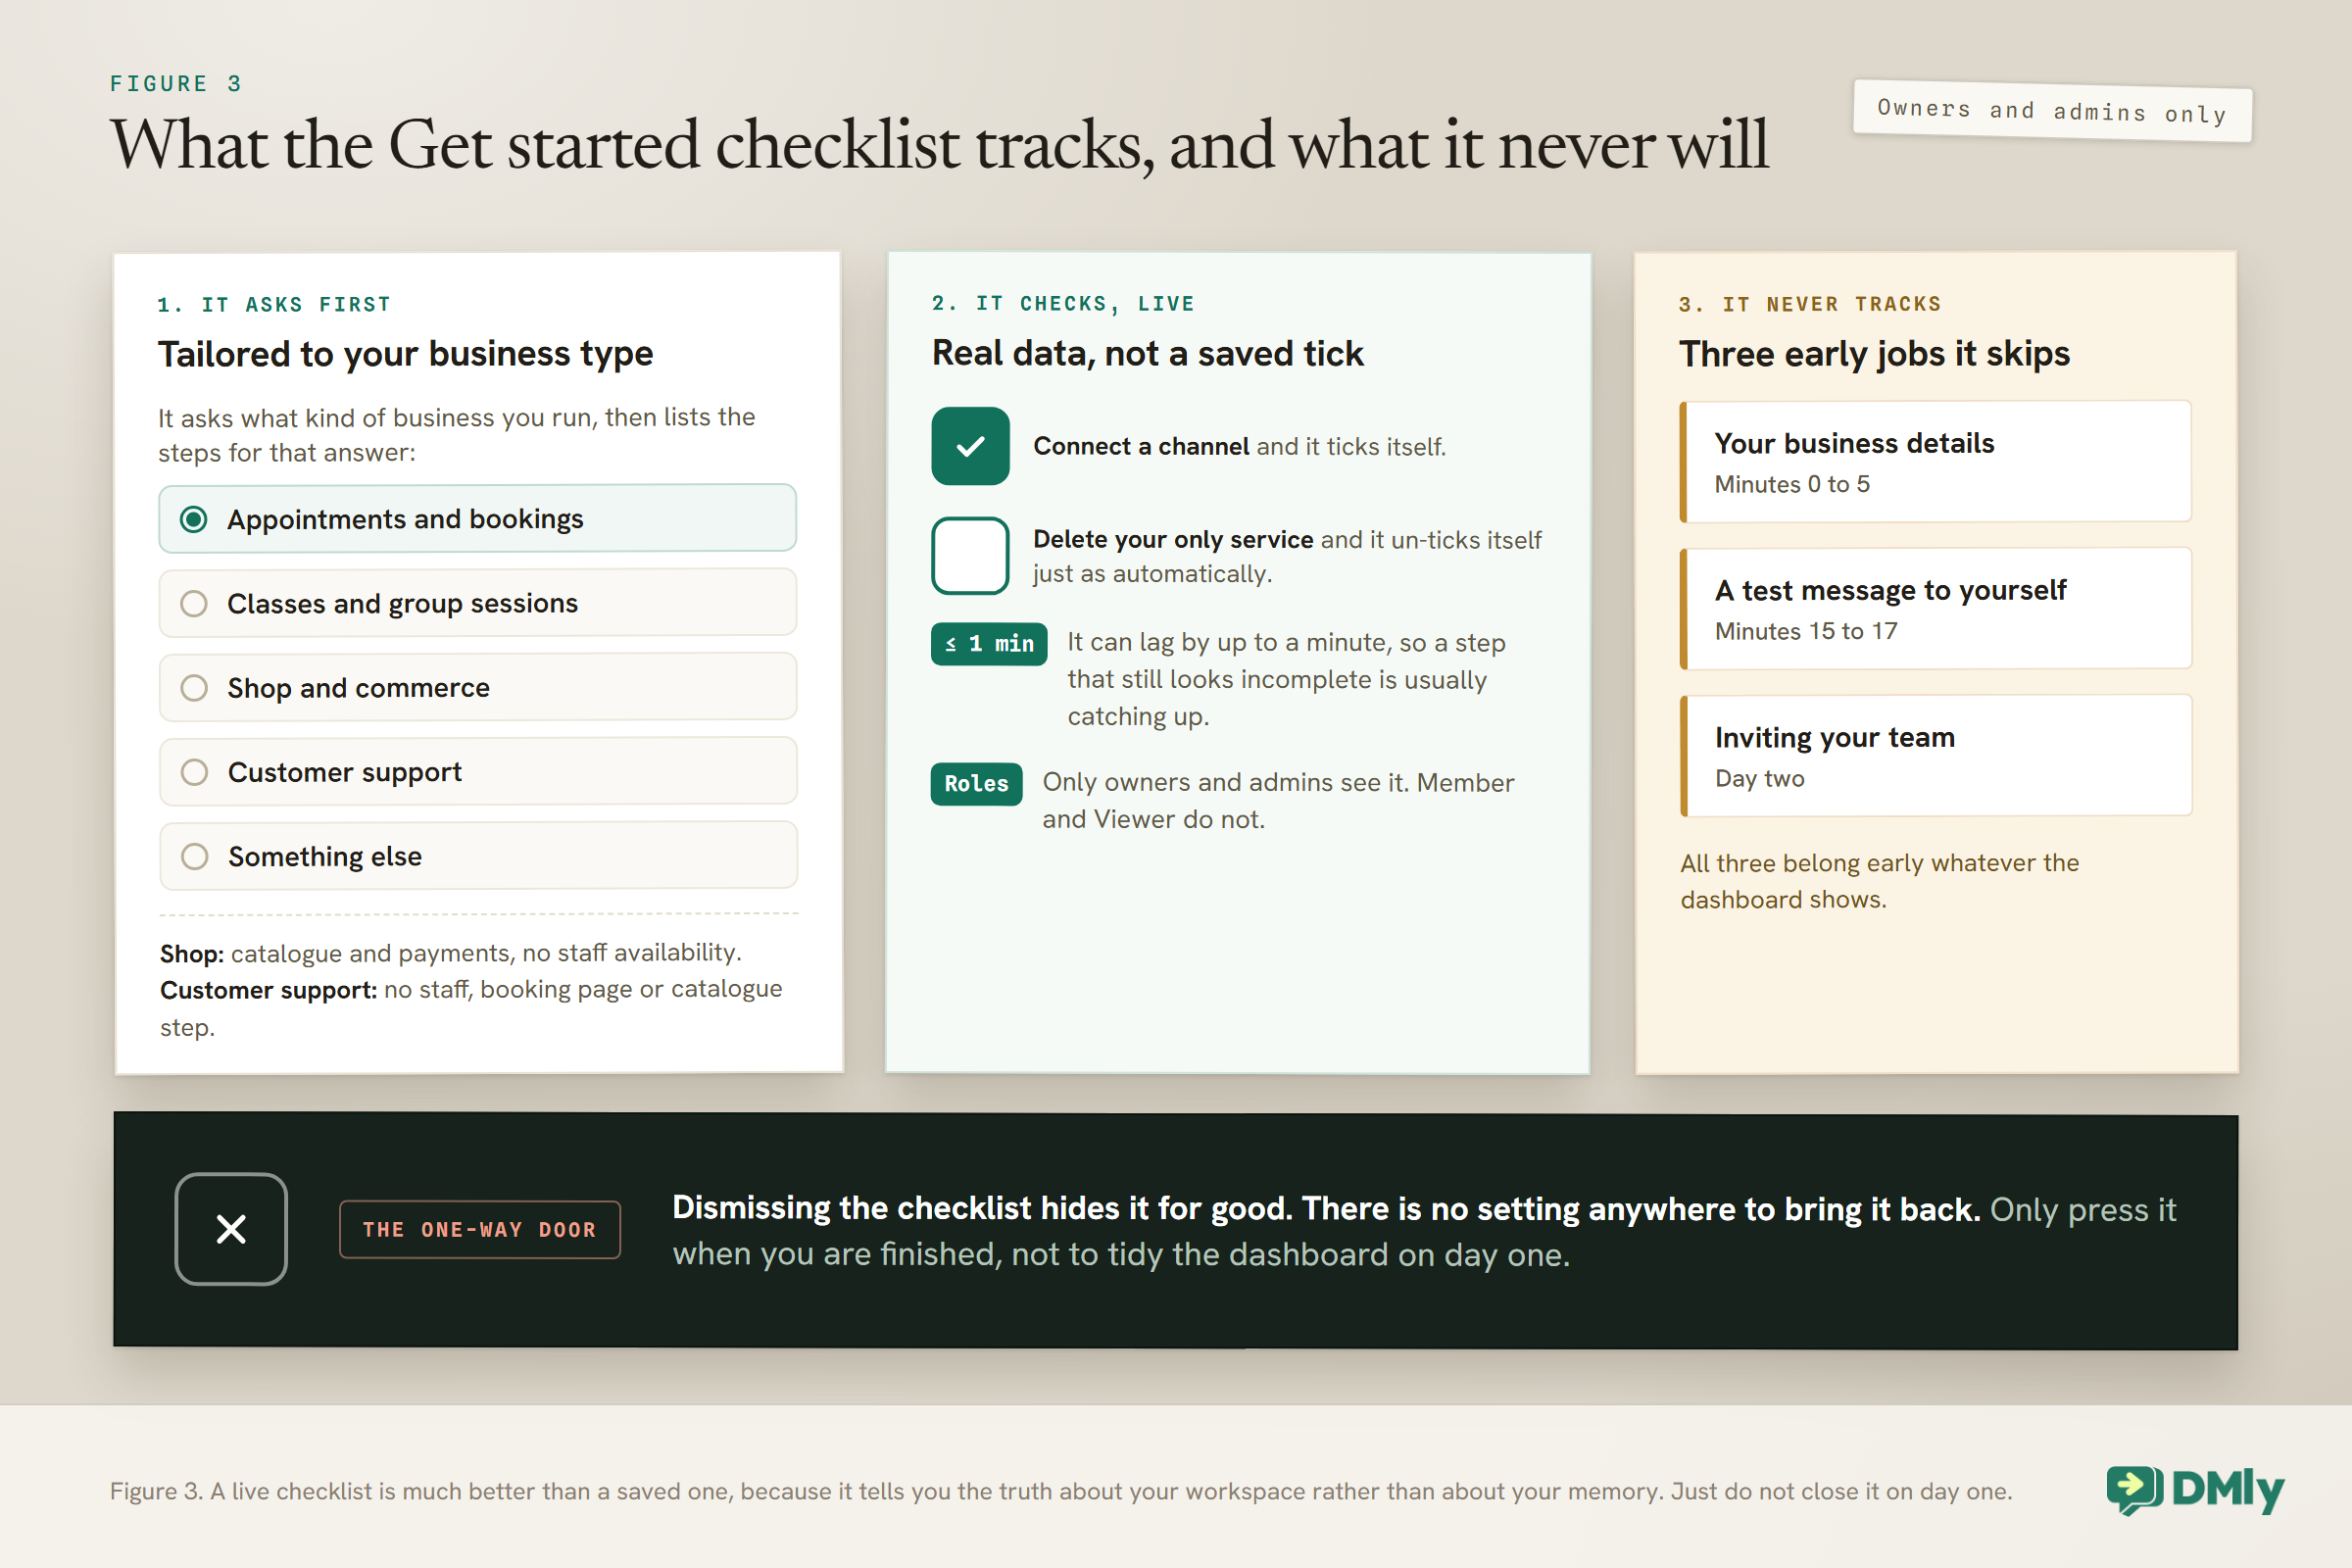
It is tailored, and it asks you how. The first time it appears, and whenever you select Change business type, it asks what kind of business you run: appointments and bookings, classes and group sessions, shop and commerce, customer support, or something else. Your answer decides which steps it lists. Pick a shop and it lists your catalogue and payments but not staff availability. Pick customer support and it lists a channel, a contact, an automation and getting a template approved, with no staff, booking page or catalogue step at all.
Every item is a live check against your real data, not a saved tick. Connect a channel and it ticks itself. Delete your only service later and it un-ticks itself just as automatically. It can lag by up to a minute after you finish something elsewhere, so a step that still looks incomplete is usually just catching up.
Only owners and admins see it. A teammate on the Member or Viewer role does not, which is sensible because most of its steps link to screens they cannot open, and worth knowing if you are expecting a colleague to work through it.
And the button. Dismissing the checklist hides it for good. The × in the corner, or Dismiss once every step is done, and there is no setting anywhere to bring it back. Only dismiss it when you are genuinely finished, not to tidy up your dashboard on the first day.
One last thing about it: it does not cover everything on this page. Filling in your business details, sending yourself a test message and inviting your team are not tracked on it, and all three belong early in your setup regardless of what the dashboard shows.
Can You Do Any of This on a Phone?
Some of it, and knowing which half saves you an argument with a small screen.
There is a mobile app, listed as DMly: Inbox, CRM and Bookings on both Google Play and the App Store, and it signs in with the same email and password as the dashboard. It is built for running the day rather than for building the workspace: four tabs, with Home showing unread, appointments today and money in, an inbox spanning every channel with a pill on each WhatsApp conversation showing how much of the 24-hour window is left, and a calendar where you can create, complete, reschedule, message and cancel a booking.
What it is not is a setup tool. Connecting a channel, adding services, setting staff hours, wiring a payment gateway and building an automation are all dashboard jobs, and the app hands you to the dashboard when a job belongs there. It does cover the moment people tend to worry about: when a WhatsApp window has closed, the app tells you so plainly and offers Send a template, so you can pick one of your approved templates, fill in its values and check a preview before it goes. Creating and submitting new templates is still done on the dashboard.
The practical advice, then: do the thirty minutes on a laptop, install the app afterwards, and use it for the part it is good at, which is answering people and moving bookings around while you are away from a desk.
The Three Things to Do on Day Two, Not Day One
All three are tempting on the first afternoon and all three go better once your channel is genuinely live.
Invite your team. Bottom-of-sidebar menu, Team Members, Invite member. Enter an email address, pick a role, send. There are three base roles: Admin, who can access and edit everything; Member, who can do everything except the configuration section; and Viewer, who is read-only. If none fits, build a permission set under Team Roles and pick it in the invite dialog, though note that the product ships no ready-made custom roles, so anything in that list is one your workspace created. People join by clicking the emailed invitation and there is no way to add somebody directly. On the current published plans, three, six and fifteen team seats are included by tier, with extra seats at ten dollars a month.
Do this after the channel is live, so a teammate’s first login shows them real conversations rather than an empty screen. If several of you will be answering, our guide to running a shared team inbox on WhatsApp covers how assignment and takeover behave.
Import your contacts. Contacts, then Import. Take the sample file first and match your columns to it, which is the single habit that prevents most failed imports. This comes last on purpose: anybody who messages you becomes a contact automatically, so importing is about your existing list rather than about getting started.
One warning that matters more than the mechanics. Importing a list is not consent to broadcast to it. WhatsApp holds you to the number’s opt-in, not to your spreadsheet, and the Unsubscribe tag ships locked and cannot be deleted for exactly that reason.
Send your first broadcast, once a template is approved. Not before, because there will be nothing in the picker. Our guide to WhatsApp broadcasts covers what to send, and the guide to message templates covers why some get rejected.
What You Will Not Have Finished When You Set Up DMly in Half an Hour
An honest list, because a guide that tells you to set up DMly in half an hour and then pretends everything is finished sets you up to feel behind.
WhatsApp will not necessarily be live. Meta approves your number on its own schedule. This is the whole reason the plan above starts that clock first.
Your templates will not be approved. Usually under 24 hours, in our experience, but it is Meta’s decision and not ours.
Your messaging limit will start low. A business not yet verified with Meta begins at 250 customers in any 24 hours. Perfectly fine for a first week, and worth knowing before you plan a launch campaign.
Your automations will not be good yet. The first one is a greeting. The useful ones, the booking flow, the reminder sequence, the review request, come after you have watched real conversations for a week and know what people actually ask.
None of that is a reason to stretch the first session out. Thirty focused minutes to set up DMly gets you a branded workspace, a live inbox, a bookable service, working payments and a running automation, with two external clocks ticking in the background. That is a genuinely working setup, and everything after it is improvement rather than installation.
Frequently Asked Questions
Can I really set up DMly in 30 minutes?
Thirty focused minutes covers your business details, a connected channel, a bookable service with working hours, a payment gateway and a first automation. It does not cover Meta approving your WhatsApp number or reviewing your templates, because neither is yours to schedule. Our own documentation suggests setting aside about an hour, and the difference is mostly the waiting.
What do I do first?
Start the WhatsApp connection, because it is the only step that depends on somebody else, then go and do everything else while it runs. Doing it in the reverse order means finishing your setup and then sitting still.
Why can I not open Contacts, Broadcasts or Automation?
Because no channel is connected yet. Contacts, Broadcasts, Automation, Meetings and Growth Tools all show “Connect a channel first” until one is. It is the commonest reason a new workspace feels broken, and it is not broken.
My booking page shows no available times. What is wrong?
Almost certainly the staff working hours. Nobody is offered a slot until a staff member’s hours are set under Business, Appointments, Staff. A service with no hours behind it produces an empty page and no error message at all.
Which WhatsApp connection route should I choose?
Embedded Signup, which the product labels Simple and estimates at ten minutes. The alternative, bringing your own Cloud API keys, is labelled Complex and estimated at thirty, and only makes sense if you already run your own Meta app.
Why is my payment showing as unpaid when the customer paid?
Almost certainly the missing webhook. After pasting your gateway credentials you have to add the webhook endpoint in the provider’s own dashboard, not in DMly. Without it a client can pay successfully at the gateway while the invoice or booking still shows as unpaid, so nothing downstream fires.
How long do WhatsApp templates take to be approved?
Usually under 24 hours, though the review is Meta’s and the timing is theirs. Until a template is approved it does not appear in the broadcast picker at all, and notifications outside a 24-hour window are skipped rather than sent.
Can I use DMly before WhatsApp is connected?
Yes, if you connect something else. Telegram is fully self-serve with a bot token, and a live chat widget only needs a snippet on your website. Either one unlocks the inbox and the automation builder today, and you can add WhatsApp to the same workspace later.
Where are services set up?
Under Offerings, then Services, not under Appointments. This catches nearly everybody. Appointments manages bookings, staff, availability and the booking page; the service itself, with its duration, buffers, price and payment mode, is edited under Offerings.
Can I get the Get started checklist back after dismissing it?
No. Dismissing it hides it permanently and there is no setting anywhere to restore it. Only dismiss it once you are actually finished.
Do I need a payment gateway to take bookings?
Only if you want to charge for them online. A service can be set to take no payment at all, and you can add a gateway later without rebuilding anything. If you do want to take a payment up front to protect against no-shows, that is the pay-before-booking mode, and it needs a gateway connected first.
Writing about WhatsApp automation, bookings and growth for local business.
Turn WhatsApp into your busiest channel.
Start free and run message, bookings, payments and reviews in one place.
