
How to Set Up a WhatsApp Business Account: Step-by-Step Guide (App and API)
“I set up a WhatsApp Business account yesterday.” A florist in Austin says it, and she means she downloaded an app, typed in her shop’s number, picked a category and was answering customers before her coffee went cold.
A physiotherapy clinic in Pune says exactly the same sentence, and means something else entirely. Their manager signed in with Facebook, created a business portfolio, added a number to something called a WhatsApp Business Account, typed in a six-digit PIN, put a card on file at Meta and is now waiting for message templates to be approved.
Both are telling the truth. “WhatsApp Business account” is the name of two different things, and the steps for one don’t work for the other. In this guide, we’ll look at which route you’re on, the number rules that decide more than people expect, the full steps for the free app, the steps for the API through a provider (including DMly) or directly with Meta, the payment method and display name, and the problems that stop most setups halfway.
How to Set Up a WhatsApp Business Account: Pick Your Route First
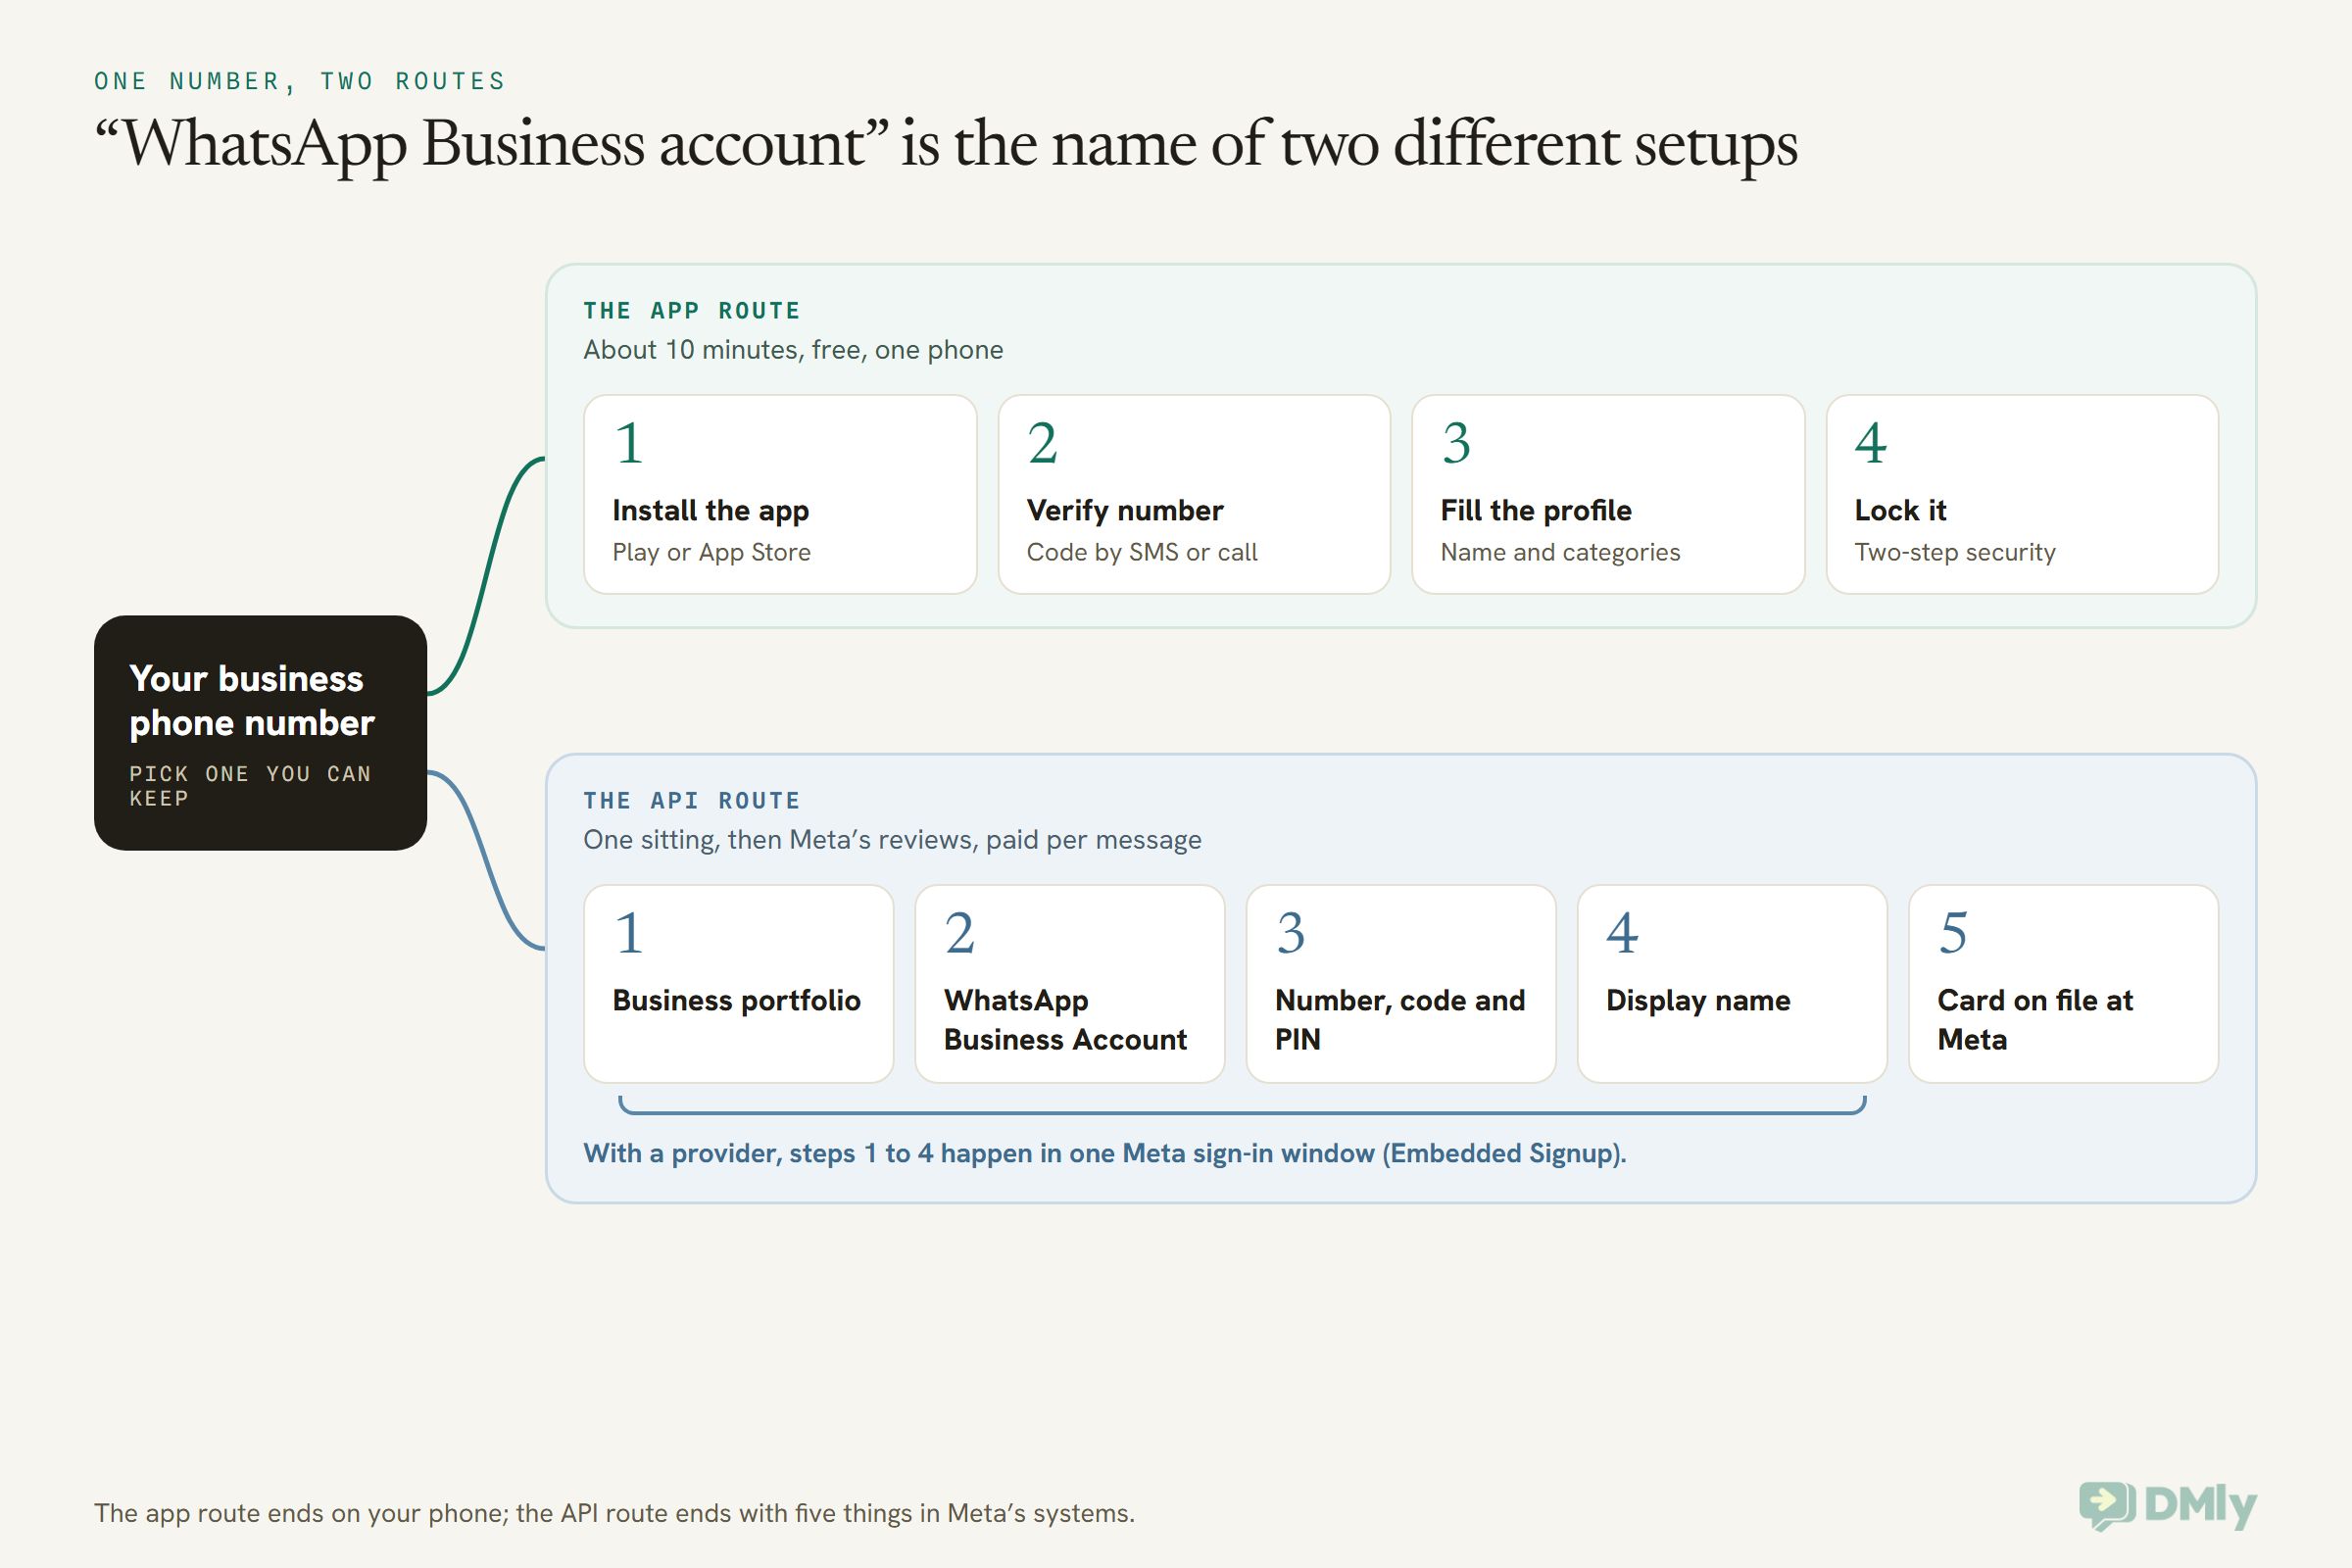
There are two ways to set up a WhatsApp Business account: the free WhatsApp Business app, which you install on one phone and set up in minutes, or the WhatsApp Business Platform (the API), which you set up through Meta’s business tools, usually with a provider, and pay for per message. Decide which before you touch anything, because the number you use can’t sit on both at once unless you choose a special mode.
Here’s the short version of each.
| WhatsApp Business app | WhatsApp Business API (Platform) | |
| Where you set it up | An app on your phone | Meta’s business tools, usually through a provider’s “connect” button |
| What you need | A phone and a number that can take an SMS or a call | A Facebook or Meta business login, a number, a payment card for Meta, often a provider |
| Time | About ten minutes | One sitting for you, then Meta’s reviews run in the background |
| Cost | Free | Meta charges per delivered message, plus whatever your provider charges |
| Who can answer | The phone, plus linked devices | A whole team, with automation, from a shared inbox |
If you’re not sure which you need, our comparison of WhatsApp Business app vs API walks through the decision, and the three types of WhatsApp accounts explains when it’s time to switch. This page assumes you’ve decided and want the steps.
Before You Start: Choose a Number You Can Keep
The number is the one decision you can’t easily undo, so choose it before anything else: one number can only be active on one WhatsApp account at a time, and the app and the API accept different kinds of number.
Three questions settle it.
Is the number on WhatsApp already? If it’s on your personal WhatsApp, WhatsApp’s Help Center says you can move that account, including chat history and media, into a new WhatsApp Business app account. You can run personal WhatsApp and WhatsApp Business side by side, but on two different numbers. For the API, Meta says a number already in use with WhatsApp must be deleted from it first, with one exception: a WhatsApp Business app number can connect through a provider that supports coexistence, and keep the app working.
Would you hand this number to a member of staff? If the answer is no, get a second line now. Moving a business number later is far more painful than buying a SIM today.
What kind of number is it? This is where the two routes differ most, and it’s rarely written down side by side.
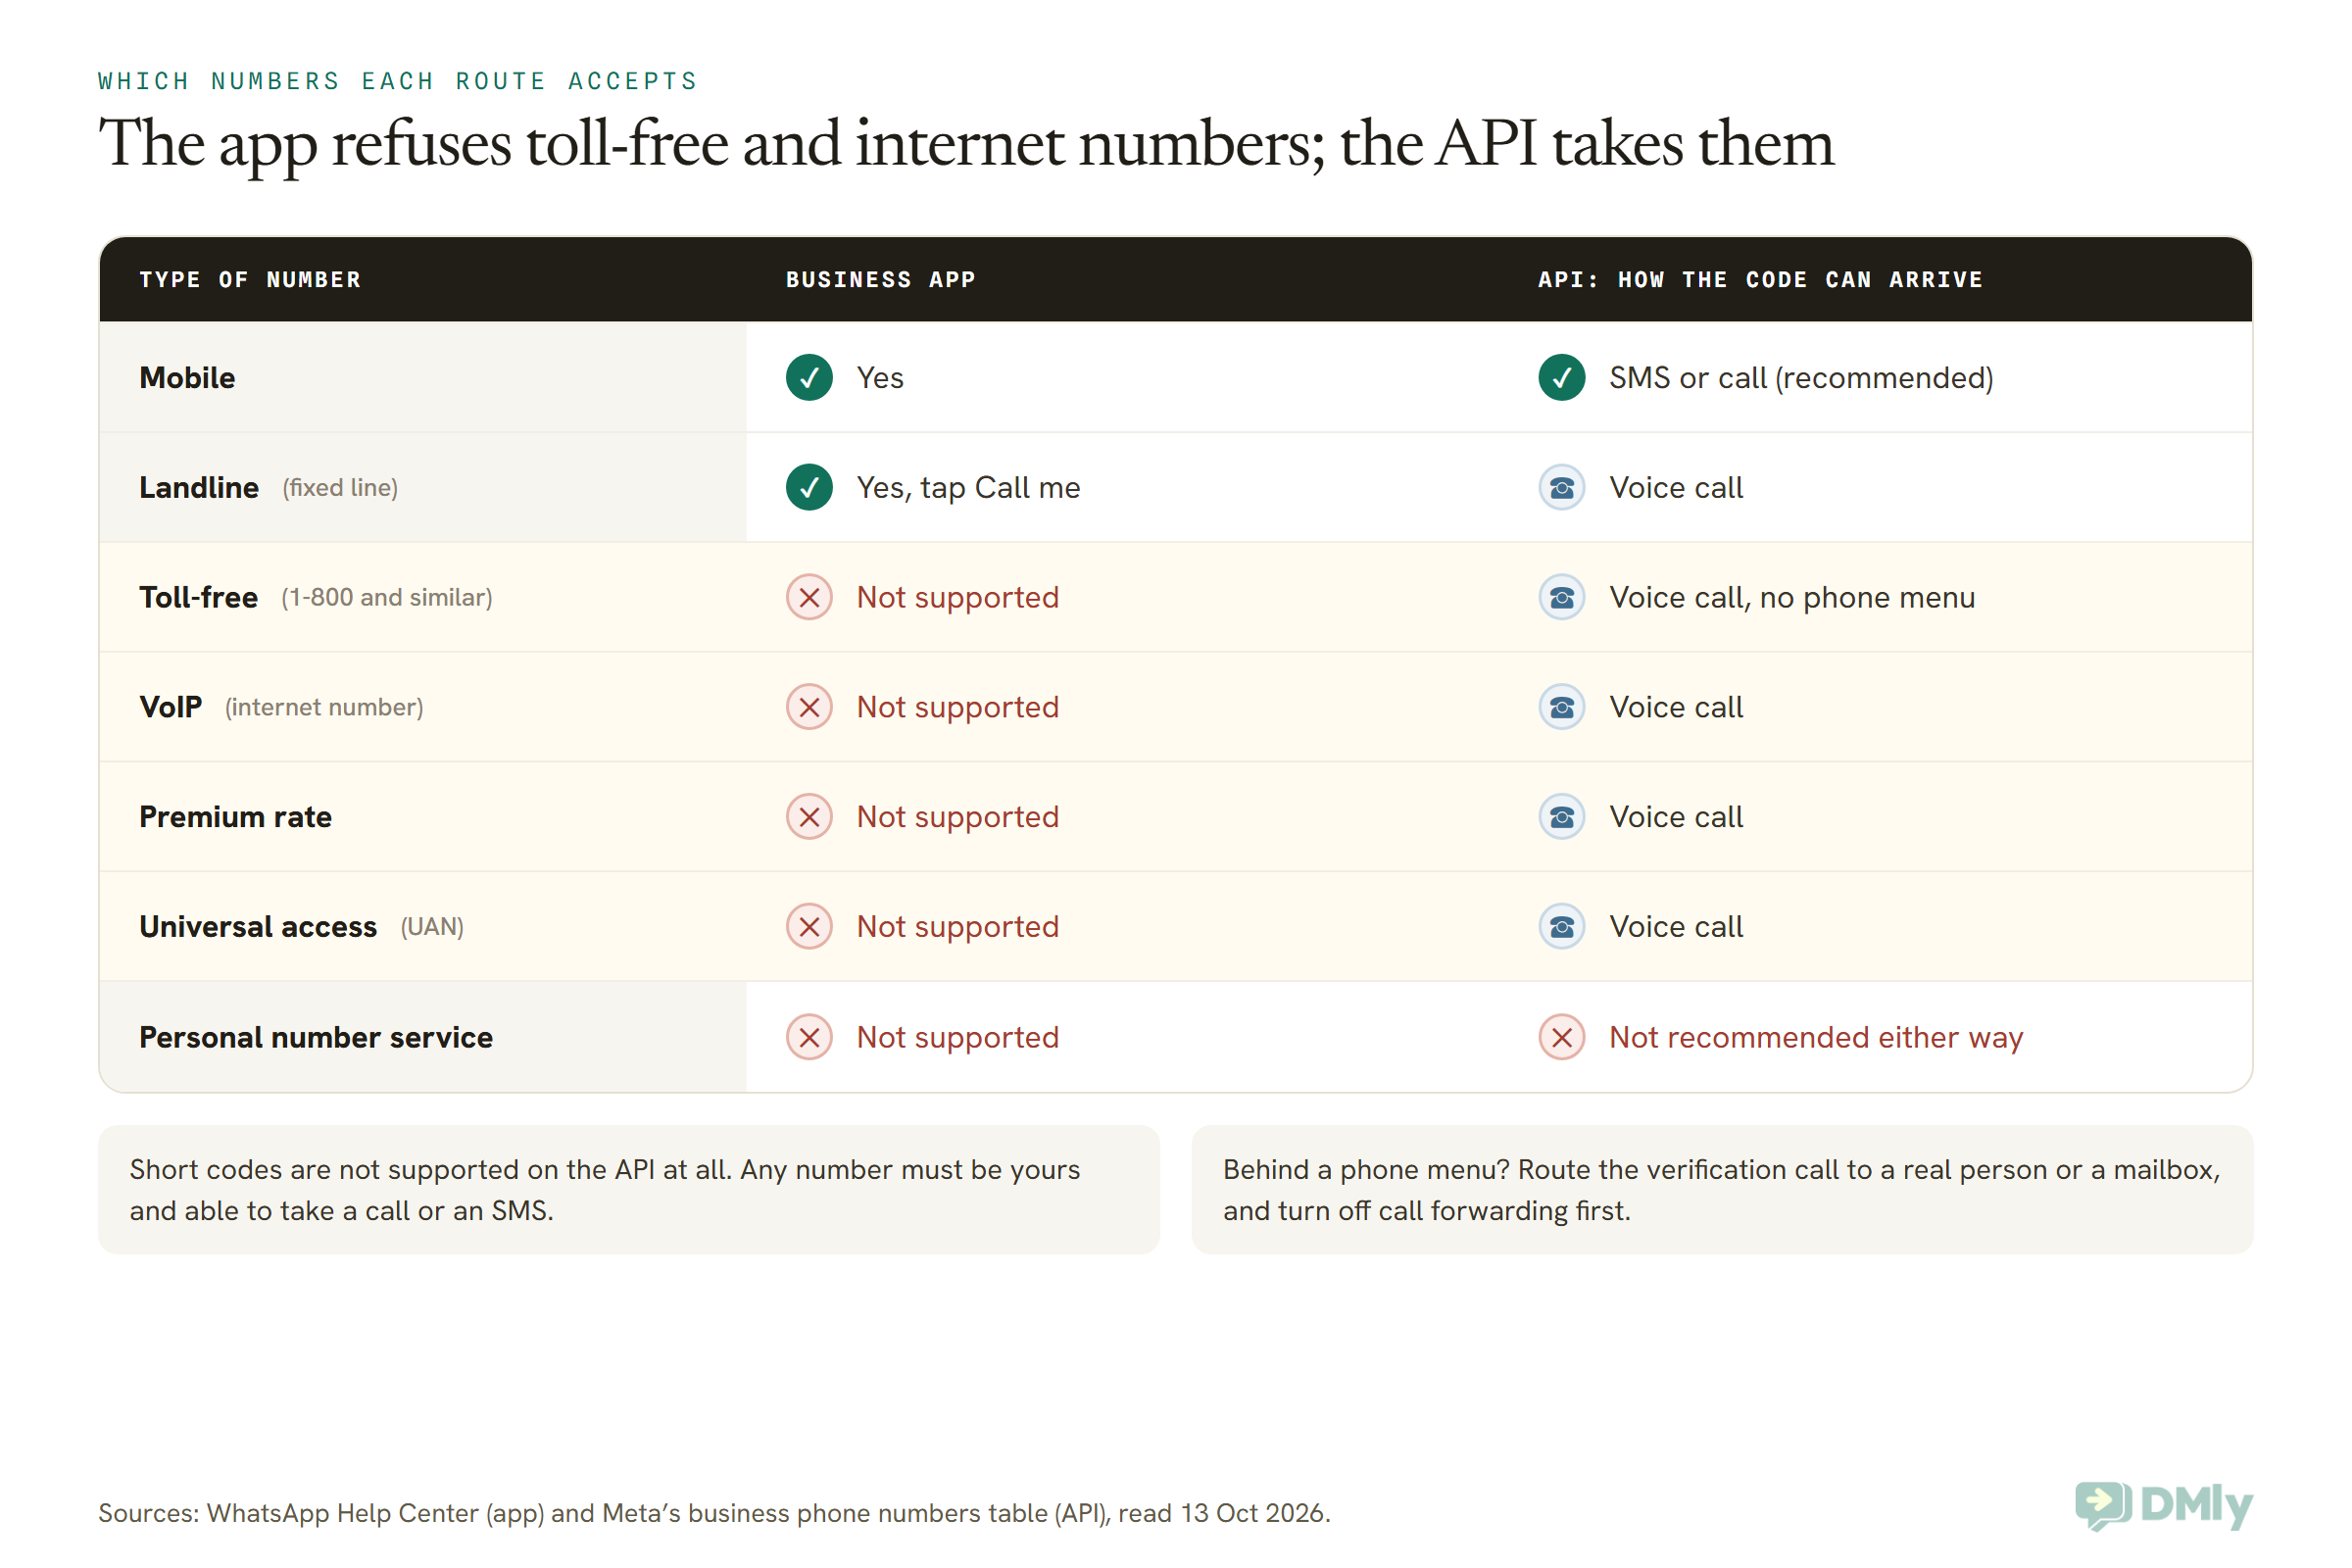
On the API, Meta’s eligibility list is short: the number must be owned by you, have a country and area code (short codes aren’t supported), and be able to receive a voice call or an SMS. A number behind a phone menu can still work, but the verification call can’t press buttons, so Meta asks you to route the call to a real person or a mailbox and to accept calls from abroad. If you’re weighing a landline, a VoIP line or a toll-free number for the API, pick the voice call option for your code and turn off call forwarding first.
How to Set Up a WhatsApp Business Account on the App (Android and iPhone)
To set up a WhatsApp Business account on the app, download WhatsApp Business, agree to the terms, verify your number with a six-digit code, then fill in your business name, categories, hours, photo, address and description. The steps below follow WhatsApp’s own Help Center, which is the same on Android and iPhone apart from the button labels (Next on Android, Continue on iPhone).
Part one: install and verify your number
- Download the WhatsApp Business app from the Google Play Store or the Apple App Store. It’s free. Make sure it’s the one called WhatsApp Business, not the ordinary WhatsApp.
- Open it and accept the terms. Read the WhatsApp Business Terms of Service (and, in some regions, the WhatsApp Business App Privacy Policy), then tap Agree and continue.
- Enter your number. Choose your country from the list, which fills in the country code, then type the number without a leading 0.
- Get the code. Tap Done and wait for a six-digit code by SMS. On a landline, or if the SMS doesn’t come, tap Call me and an automated voice reads the code out.
- Type the code in, and don’t guess. WhatsApp’s Help Center warns that guessing locks you out for a while. If the timer runs out, wait for the Call me option instead.
If you’re moving a number that was on personal WhatsApp, the app offers to bring that account across. That’s how you keep your chat history.
Part two: build the business profile
- Business name. The name on your sign and your invoices. Not a slogan.
- Categories. You can pick up to three from WhatsApp’s suggestions, or tap See more categories. You can’t type your own.
- Business hours. Set the hours people can expect a reply, not only the hours the door is open.
- Profile photo. Your logo, cropped so it survives a circle. You can skip this and add it later.
- Address and website. Add them if customers visit you; skip the address if you work from home.
- Description. A short paragraph on what you do and why someone should message you. The app now offers Refine with Meta AI to tidy a draft, which is optional.
- Finish with Continue, then Done.
That’s the account. For what to write in each of those fields, and which ones customers actually see first, our guide to WhatsApp Business profile setup, and the name customers see goes field by field.
Part three: lock it before you need to
The step people skip is the one that protects the whole thing. Turn on two-step verification so nobody can re-register your number on another phone with a stolen code.
- Go to Settings → Account → Two-step verification.
- Toggle it on and create the secret. WhatsApp’s Help Center says it is upgrading the old six-digit PIN to a password, so you may be asked for a password rather than a PIN.
- Add an email address you can actually get into. It’s how you reset the secret if you forget it.
Once that’s done, the Help Center points you at the next things to try: a catalogue, an ad, a marketing message and getting verified. If more than one person will be answering, the app also lets you link up to four extra devices to the same account, which is where most small teams start before they outgrow it.
The Five Parts of a WhatsApp Business API Account
A WhatsApp Business API account isn’t one thing, it’s five: a business portfolio, a WhatsApp Business Account inside it, a phone number registered to that account, a display name on the number, and a payment method on the account. Knowing the parts makes every later screen make sense, because each setup step creates or selects one of them.
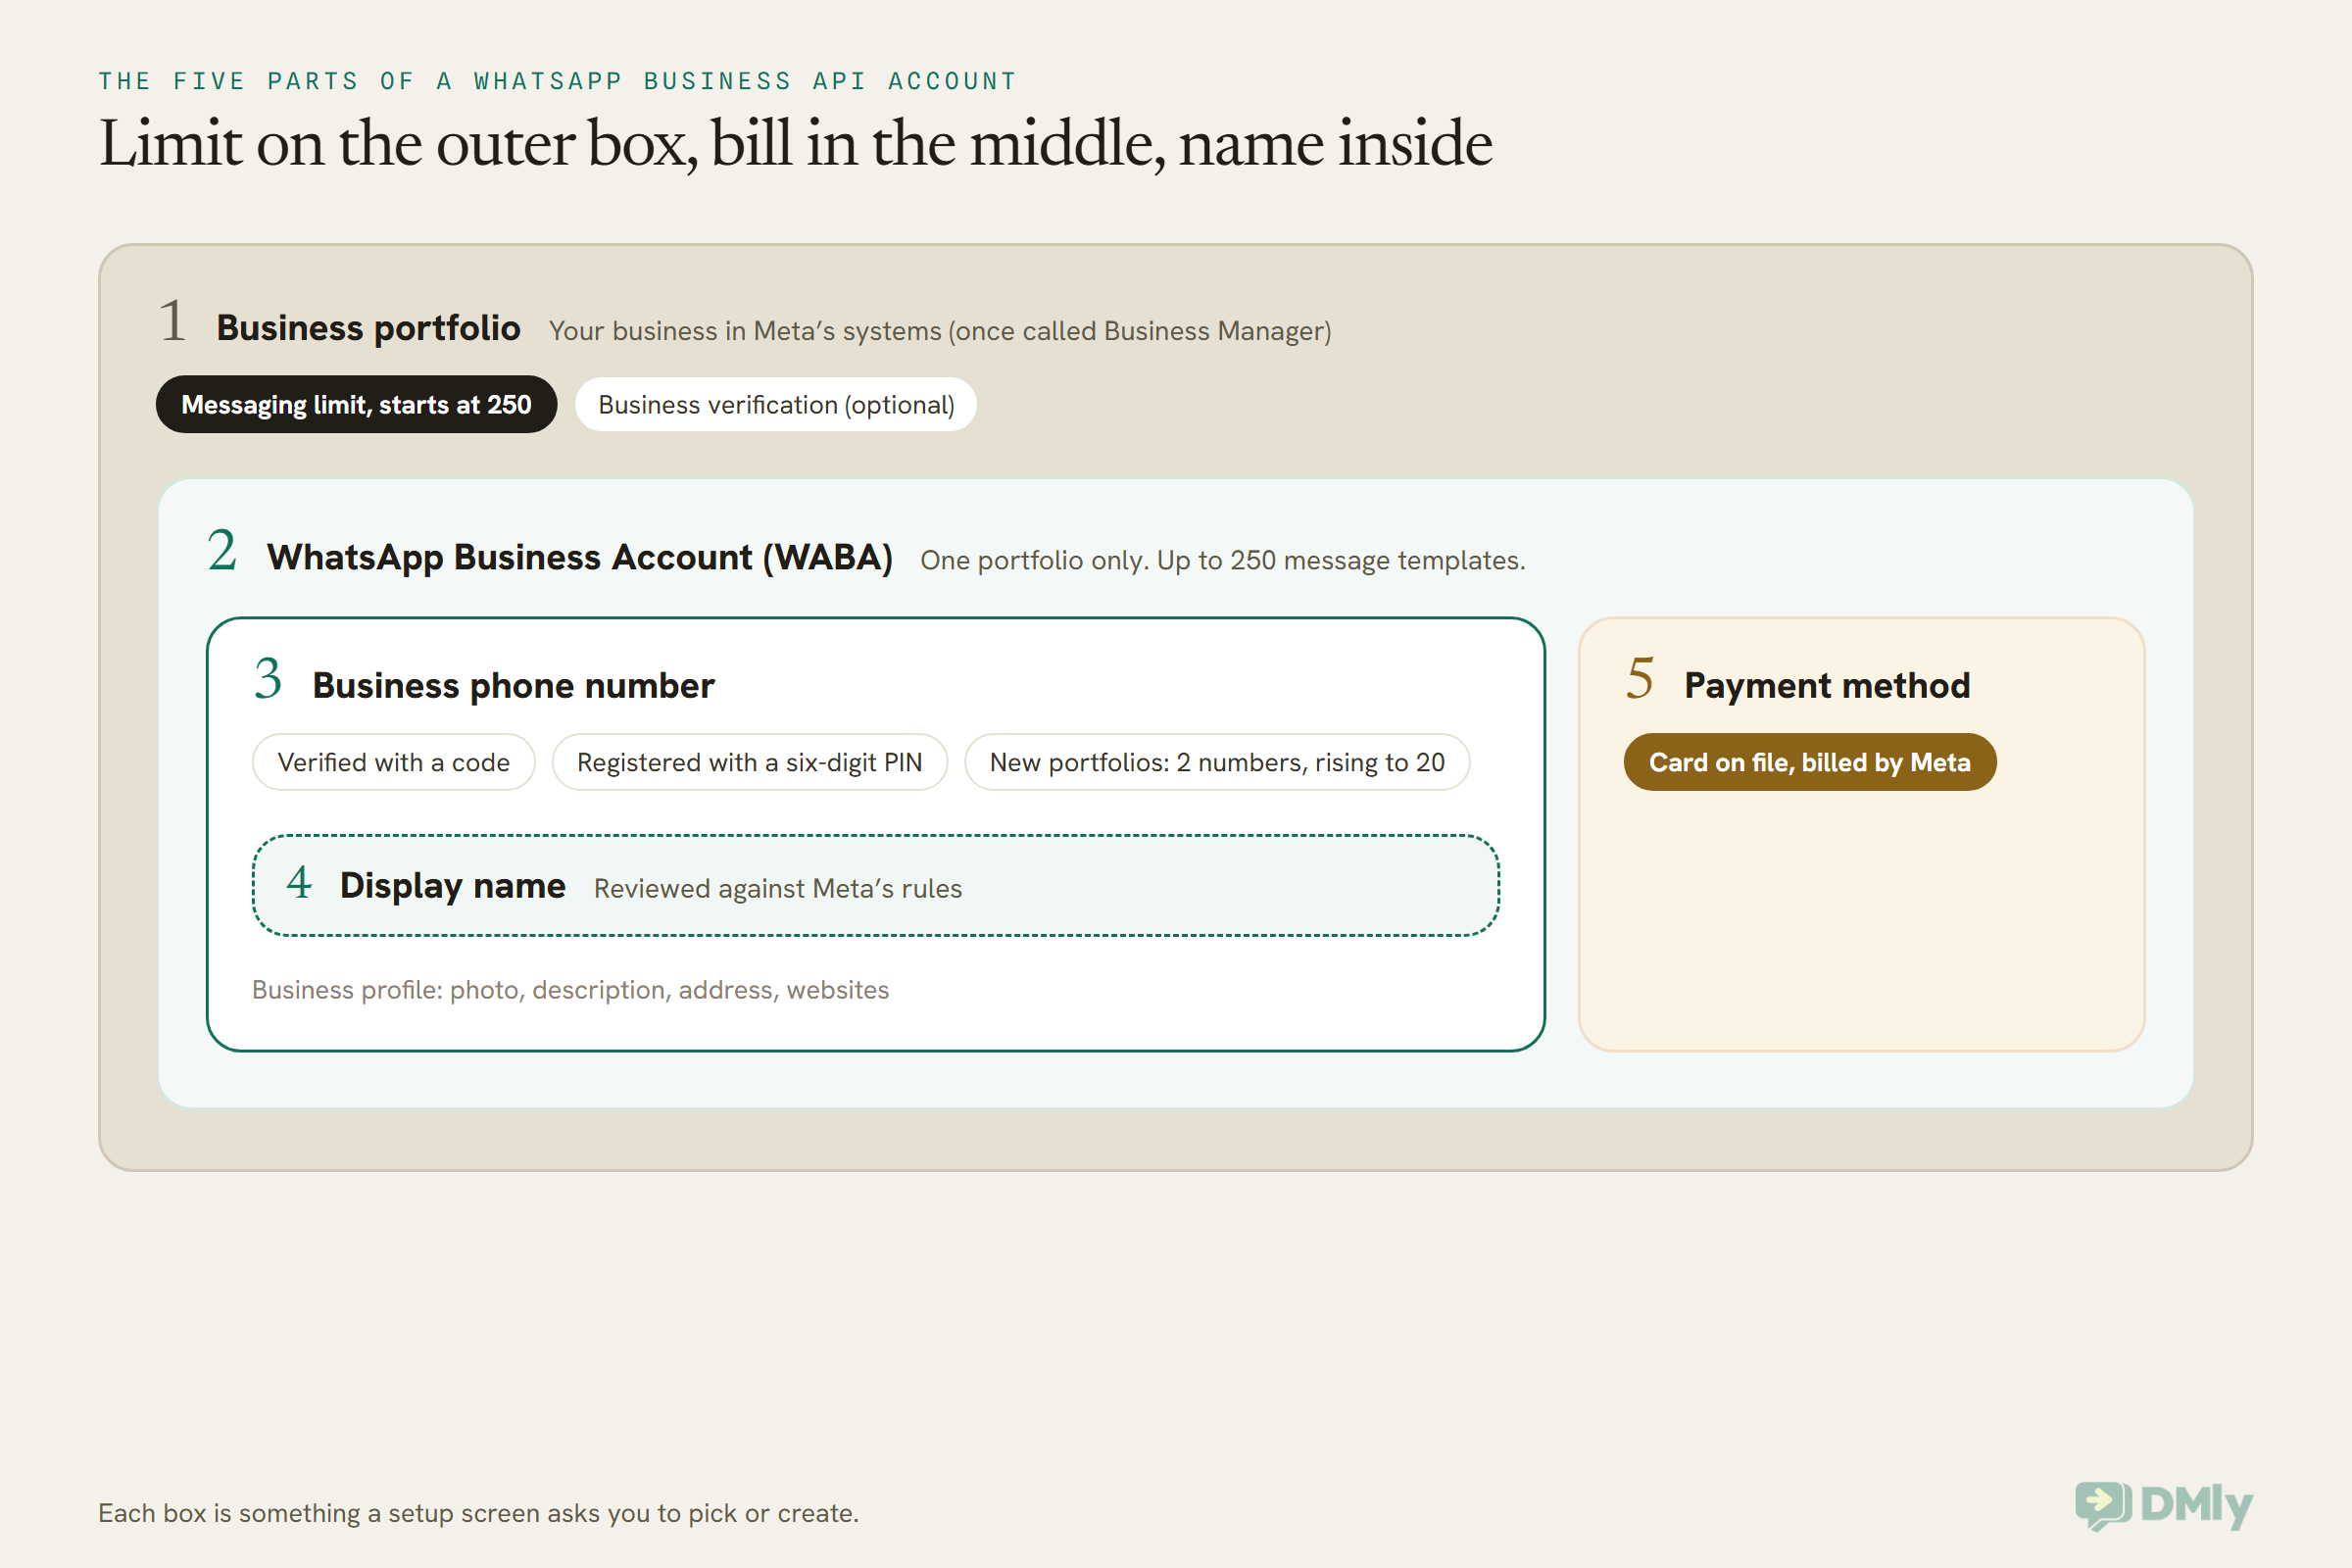
In plain words:
- Business portfolio. Your business as Meta knows it, the same container that may already hold your Facebook Page and ad account. Your messaging limit (how many new customers you can message first in 24 hours) is set here and shared by every number in it.
- WhatsApp Business Account (WABA for short). The WhatsApp part of the portfolio. Your templates live here, and so does the payment method. A WABA belongs to exactly one portfolio and can’t be moved to another business.
- Phone number. Added to the WABA, verified with a code, then registered for sending with a six-digit PIN. Meta caps new portfolios at two registered numbers and raises that to 20 once your business is verified or reaches the 2,000 messaging limit.
- Display name. The business name attached to the number. Meta asks for it during setup and reviews it against its guidelines.
- Payment method. A card on the WABA so Meta can bill your messages.
There are three ways to create all of that. Most small businesses should use the first.
WhatsApp Business API Setup Through a Provider (Embedded Signup)
The easiest way onto the WhatsApp Business API is through a provider that uses Meta’s Embedded Signup: you click Connect inside the provider’s app, sign in with Facebook, and Meta’s own window creates the portfolio, the WhatsApp Business Account and the number for you. The account is created in your name, and Meta’s documentation says you keep full access to it in WhatsApp Manager, which no provider can restrict.
Meta’s window walks you through these screens, in this order:
- Sign in with your Facebook or Meta business login.
- Accept the terms and review what the provider’s app will be allowed to do.
- Pick or create a business portfolio. Use your existing one if your Facebook Page and ad account already live there.
- Pick or create a WhatsApp Business Account. If you have none, create one here.
- Add your phone number and choose whether the code comes by SMS or voice call.
- Verify the number with that code.
- Enter your display name, the business name customers will see.
- Review and finish. Meta confirms it created and linked the portfolio, the WABA, the display profile and the number.
After you click Finish, the provider finishes the job on its side. It connects the account so incoming messages reach its inbox, and it registers your number for sending; some providers, DMly included, ask you for the number’s six-digit PIN to do that. Then, unless the provider bills your messages itself, you add a payment method, because Meta’s documentation says a business onboarded this way must attach one before it can start messaging.
Two details worth knowing before you click:
- Finish every screen. Closing the window halfway leaves you with nothing connected, and you start again.
- An account built in Meta’s developer dashboard can’t be picked here. Meta’s documentation says a WhatsApp Business Account originally created through a developer app can’t be selected in Embedded Signup. If you experimented with the developer route first, create a fresh WABA in the signup window.
And one date. Meta’s documentation said the oldest version of Embedded Signup, version 2, would be deprecated on 15 October 2026, with version 4 the latest. That’s a job for providers, not for you. If a provider’s connect button errors, tell their support team; it’s not something you can fix from your side.
Step by Step: WhatsApp Business API Setup in DMly
In DMly, you set up the WhatsApp Business API from Integrations: Add account, WhatsApp, Connect a WhatsApp number, finish Meta’s signup window, then register the number with its six-digit PIN and add a card in Meta Billing. DMly’s docs label the whole connection “Simple (10 mins)”, and in practice the slow parts are Meta’s reviews afterwards. Here’s the documented path.
Before you start, have three things ready, all from DMly’s own checklist: a number that meets Meta’s criteria, access to your business portfolio at Meta, and your business documents in case you choose to verify your business. Your DMly plan also needs to include the WhatsApp channel; if it doesn’t, connecting is blocked and you’re asked to upgrade.
- Open the channel picker. In the left sidebar go to Configurations → Integrations. The Channels tab opens by default. Select Add account, then the WhatsApp tile (Connect a business number). This opens WhatsApp Cloud API Configuration.
- Choose Embedded Signup. Under Configure WhatsApp via Embedded Signup, marked Simple (10 mins), select Connect a WhatsApp number. A requirements page appears; read it.
- Pick the mode. Select Connect a WhatsApp number again for a normal connection, where the API takes the number over. If your front desk wants to keep using the WhatsApp Business app on the same number, use Connect in co-existence mode under Already using the WhatsApp Business app? instead. This choice is made once; switching later means disconnecting and reconnecting.
- Finish at Meta. You’re taken to Facebook to sign in, pick or create the WhatsApp Business Account, add the number and verify it with the code Meta sends. Complete every screen.
- Land back in DMly. DMly reads the account and number you granted, subscribes the number to incoming messages, creates the channel, and submits its built-in message templates to Meta for review.
- Register the number. Open Bot Setup → WhatsApp → Configuration. If Number registration shows Not registered, enter the six-digit two-step verification PIN for that number. A co-existence number shows Business app + Cloud API instead and needs no PIN.
- Add a payment method. On the same tab, under WhatsApp Cloud API settings, select Open Meta Billing. Messages are billed by Meta, not DMly, and DMly adds nothing on top of Meta’s rates.
- Send yourself a test. Message the number from your own phone and check it lands in Unified Inbox. Connected and receiving are two different things, and this is how you find out which one you have.
The one that catches people is step 6. DMly’s docs put it bluntly: connected is not the same as registered, and a normal number that isn’t registered can’t send or receive anything, even though it shows up in the app. On that Configuration tab, read the Number registration row specifically. Number verification and Display name status can be green while registration is still missing.
If you went the co-existence route, your phone app keeps working and DMly asks WhatsApp for your existing contacts and chats, which WhatsApp allows once, in the first 24 hours after you connect. Our WhatsApp coexistence guide covers what turns on and what turns off when you do this, including the app features Meta switches off on a shared number.
DMly also offers a second option on the same page, Bring your own WhatsApp Cloud API keys, marked Complex (30 mins). It’s for businesses that already run their own Meta developer app, and it asks for a permanent API token, the Phone Number ID and the WhatsApp Business Account ID. If none of those words are familiar, it isn’t for you. For the rest of the workspace (services, bookings, payments, your first automation), our walkthrough on how to set up DMly in 30 minutes picks up where this section ends.
Setting Up the WhatsApp Business API Directly With Meta
You can set up the API with no provider at all, through Meta’s App Dashboard, but you’ll need a developer: registering the number happens through an API call, and the inbox, automation and reporting are yours to build. Meta’s Get Started guide lays out the path:
- Register as a Meta developer with your Facebook account and open the App Dashboard.
- Create an app, choose the Connect with customers through WhatsApp use case, and select or create a business portfolio.
- Open API Setup and connect the app to a WhatsApp Business Account, or create one. Meta gives you a test number to send your first messages from.
- Add your real number in API Setup, then verify it with a code by SMS or voice.
- Register the number by calling Meta’s register endpoint with a six-digit PIN. Meta’s docs are clear that this can only be done through the API, not in WhatsApp Manager or the App Dashboard.
- Create a system user in your business settings and generate a permanent access token, because the temporary one expires quickly.
- Set up a webhook so incoming messages and delivery receipts reach your server.
- Add a payment method to the WABA in WhatsApp Manager.
It’s free to access, and it’s the right choice if you’re building a product. For a salon, a clinic or a shop, it means paying someone to build and maintain what a provider already has. Meta also documents a middle path, creating a WABA in Meta Business Suite under Settings → Accounts → WhatsApp accounts → Add, for businesses whose partner works through Business Suite. Meta notes that option is rolling out gradually and isn’t yet available to portfolios with a Brazil or India address.
Whichever way you build it, our pillar on the WhatsApp Business API for small businesses explains who does what between Meta, your platform and you, and why “whose name is the account in?” is the question to ask any provider.
Adding a Payment Method to Your WhatsApp Business Account
To add a payment method, open WhatsApp Manager, go to the account’s settings, open Payment settings and add a Visa or Mastercard. Meta needs a card on file before it will bill you for messages, and if a provider onboarded you without billing messages itself, before your number can send at all. Meta’s Help Centre lists the steps:
- In WhatsApp Manager, go to the Overview page.
- Find the account, click the three-dot icon, then Manage account settings.
- On the Settings tab, click Payment settings.
- Click Add payment method, enter your card, and save.
- Add your business information when asked. Meta may ask for tax details at this point.
On DMly you don’t have to hunt for it: Open Meta Billing on the Configuration tab opens Meta’s billing pages for you.
A few things from that Help Centre article, read on 13 October 2026, that save a failed attempt:
- Visa or Mastercard only. Meta doesn’t accept American Express or wallets such as PayPal for this.
- The currency list is short. It names AED, ARS, AUD, CLP, COP, EUR, GBP, IDR, INR, MYR, PEN, SAR, SGD and USD. The naira isn’t on it, so a business in Lagos should check with its bank how a dollar charge will appear on the card.
- You need the right permission. The person adding the card needs permission to manage the WhatsApp account. The owner has it automatically.
That same Help Centre page still describes service messages (your free-form replies inside a customer’s 24-hour window) as free. Meta’s pricing pages changed that on 1 October 2026: service messages are now charged after the first 1,000 each month on each number, and utility messages sent inside an open window are charged too. Our explainer on the WhatsApp pricing change on 1 October has the detail, so you know what the card will actually be charged for.
Your Display Name: What You Type, and What Gets Reviewed
You give your display name during setup, it appears on your WhatsApp profile straight away, and it’s reviewed against Meta’s guidelines automatically once your number reaches a higher messaging limit. Until it’s approved, customers who haven’t saved your number may see the number rather than your name at the top of the chat.
Meta’s display name guidelines come down to one idea: the name should be your business, the way the world already knows it. From its accepted and refused examples:
- Refused: a generic word (“Fashion”), a place on its own (“New York”), anything implying you’re endorsed (“Official”, “Verified”), any mention of Meta, WhatsApp or Facebook, a promotion (“20% off sale”), and anything formatted as a web address or email.
- Accepted: your brand, your brand plus a department or city (“Fresh Produce Customer Service Department”, “Fresh Produce Cold Pressed Juices Mexico”), an abbreviation of your company name, or “[brand] by [company]” when the link isn’t obvious.
- The test Meta applies: a clear relationship to your legal business name, and the same branding on your website or social profiles.
You can test a name before you submit it by checking it against those refused examples one by one. And if you change it later, Meta allows ten changes in 30 days. After a change is approved the number has to be re-registered within 14 days for the new name to take effect, or the change has to be reviewed again, so ask your provider how they handle that before you edit.
After WhatsApp Business Account Setup: Limits, Verification and Templates
Once the account is set up, three things decide how far you can go with it: your messaging limit, whether your business is verified, and whether your message templates are approved. None of them stop you from replying to customers who message you first.
Your messaging limit starts at 250. Meta’s documentation says a new business portfolio can start conversations with 250 different customers in any 24 hours. It rises to 2,000 by one of two paths: verify your business, or send 2,000 delivered template messages to different customers within 30 days with good quality. After that, Meta raises it on its own. Replies to people who messaged you don’t count against it.
Business verification is optional. You can set up and run the API without it, and the 250 limit is plenty for most small businesses replying to their own customers. When you’re ready, our step-by-step on how to complete Facebook business verification covers the documents. Verification is also one of the five requirements for the blue tick (an Official Business Account), along with 30 days on the Platform, two-step verification, an approved display name and policy compliance. Meta doesn’t grant that badge to WhatsApp Business app numbers.
Templates come next. Outside the 24-hour window after a customer’s last message, WhatsApp only delivers templates Meta has approved. On DMly, the built-in confirmations, reminders and receipts are submitted the moment your number connects, and DMly’s setup checklist says review usually comes back in under 24 hours. Our guide to WhatsApp message templates explained covers the three kinds and what gets approved.
WhatsApp Business Account Setup Problems, and the Fix for Each
Most setups that stall do so at the code, the PIN or the number already being in use, and each has a known fix.
| What you see | Why | What to do |
| The code never arrives | Blocked SMS, no signal, a phone menu or call forwarding on the line | Use the voice call option. Turn off call blockers, forwarding and phone menus, and allow calls and texts from abroad. On the app, restart the phone and check the number exactly as typed. |
| “Locked out” after entering codes | Too many wrong guesses | Wait for the timer. WhatsApp’s Help Center warns against guessing for exactly this reason. |
| The API says the number is already in use | It’s still on WhatsApp or the Business app | Delete that account in the app (Settings → Account → Delete my account), back up chats first, and allow up to three minutes before trying again. Or connect in coexistence mode. |
| Connected, but nothing sends or arrives | The number isn’t registered | Register it with the six-digit PIN. In DMly: Bot Setup → WhatsApp → Configuration, Number registration row. |
| “Wrong PIN” when registering | Two-step verification already has a PIN you’ve forgotten | In WhatsApp Manager, open the number’s Two-step verification tab and turn it off; Meta emails a link to the address on your business portfolio. Then set a new PIN. Your provider can also set a new one through the API. |
| Registration refused for 72 hours | More than ten register attempts in 72 hours | Wait it out; Meta returns error 133016 and blocks further attempts until the window passes. |
| Moving from another provider fails | Two-step verification still on at the old provider | DMly’s docs say to turn it off in WhatsApp Manager first; migrations fail with it on. |
| Signup window closed, nothing connected | A screen in Embedded Signup was skipped | Start the signup again and complete every screen. |
| Coexistence number disconnected itself | The phone running the app went unused | Meta disconnects a coexistence number if the main phone is inactive for about 14 days. Open the app regularly. |
If your account was set up fine and later stopped working, that’s an account health problem rather than a setup one. Start with the number’s status and quality rating in WhatsApp Manager.
Which Setup Fits Your Business: Six Examples
The same steps land differently depending on who’s answering and how many customers you talk to. These are illustrations, not customers.
- A florist in Austin, one person, orders by chat. The app. Ten minutes, free, and the catalogue and quick replies cover her week. She turns on two-step verification the same day. When Valentine’s week needs a second pair of hands, a linked device on a teammate’s laptop buys her time before the API.
- A physiotherapy clinic in Pune, three front-desk staff. The API through a provider. Reminders have to send themselves, and three people can’t share one phone. They use the clinic’s landline with a voice code, register with a PIN, and put the card on file the same afternoon.
- A boutique in Lagos with years of chats on the app. Coexistence. The owner keeps answering regulars from her phone while the API runs broadcasts and order updates, and her recent chats come across. She checks how Meta’s dollar charges will appear on her card first.
- A property agency in Dubai, six agents. The API, with the display name written to match the trade licence and website exactly, because the name review checks for that relationship.
- A tuition centre in Kuala Lumpur with a toll-free enquiry line. The API, not the app, because the app refuses toll-free numbers. They take the verification code by voice call and route it past the phone menu to a real person.
- A salon in Manchester moving from another WhatsApp provider. The API, with two-step verification switched off at the old provider before connecting, and templates rebuilt in the new one.
Frequently Asked Questions
How long does it take to set up a WhatsApp Business account?
The app takes about ten minutes. The API takes one sitting for the connection itself (DMly labels its Embedded Signup route ten minutes), then waits on Meta for template approval, which DMly’s docs say usually comes back in under 24 hours. Business verification, if you choose it, depends on how quickly Meta accepts your documents.
Is a WhatsApp Business account free?
The WhatsApp Business app is free to download and use. On the API, Meta charges per delivered message by type and country, and providers charge for their software. Since 1 October 2026 the first 1,000 service messages each month on each number are free, and Meta charges from the 1,001st.
Do I need a Facebook account to set up WhatsApp Business?
Not for the app: WhatsApp’s setup steps only ask for your number. For the API, yes in practice: Meta’s Get Started guide lists a Facebook account or a managed Meta account as a prerequisite, and Embedded Signup signs you in with Facebook or Meta business credentials.
Can I use the same number on the WhatsApp Business app and the API?
Only through coexistence, where a provider connects your existing app number to the API and both keep working. Otherwise, connecting a number to the API takes it over and the app stops working on it. You can still use the number for ordinary calls and texts.
Do I need business verification to set up the WhatsApp Business API?
No. You can set up and use the API without it, starting at a limit of 250 new customers in 24 hours. Verification is one way to reach 2,000 and is required for the blue tick.
What is the six-digit PIN WhatsApp asks for?
It’s your number’s two-step verification PIN. When you register a number on the API, Meta asks for it; if the number has no PIN yet, the six digits you enter become its PIN. Keep it somewhere safe, because you need it to change the PIN or remove the number later.
Can I change my WhatsApp Business display name after setup?
Yes. On the app you edit the profile. On the API you edit it in WhatsApp Manager, up to ten times in 30 days, and each change is reviewed again. After approval, the number must be re-registered within 14 days for the new name to apply.
The Two Yesterdays, Compared: Before You Set Up a WhatsApp Business Account
Back to the florist and the clinic. The florist’s yesterday was ten minutes on one phone, and it was the right setup for a business with one person answering. The clinic’s yesterday had five parts in it, a PIN and a card, and it was the right setup for a business where the phone can’t be the bottleneck.
Neither is the “proper” one. The mistake is doing one when you needed the other, or doing either with a number you’ll regret. So before you set up a WhatsApp Business account, check these:
- Decide app or API, using who answers and how many customers you message first.
- Choose a number you’ll keep, that the route accepts, and that can take a call or an SMS.
- On the app: verify, fill the profile, and turn on two-step verification on day one.
- On the API: finish every Embedded Signup screen, register the number with its PIN, and put a Visa or Mastercard on file.
- Write a display name that matches your legal name and your website.
- Send yourself a test message before you tell a single customer.
If you’re going the API route and want the inbox, templates, bookings and payments in one place, you can start a 7-day DMly trial with no card and connect your number through Embedded Signup today. Meta bills the messages at its own rates, with nothing added on top.
Writing about WhatsApp automation, bookings and growth for local business.
Turn WhatsApp into your busiest channel.
Start free and run message, bookings, payments and reviews in one place.
